This was originally published in Watch The Skies, April 2024 issue.
What Covereth Thine Noggin?
When considering what to chat about with our next talented member of our crowd, I needed to figure out what in particular I could ask about! Our fabulous editor in chief is a multi-talented renaissance man worthy of this interview format! In the end, asking about Helm Haven Renaissance Wear was the place we decided to land.
What brought you to start your own garb shop? How did you get started doing this?
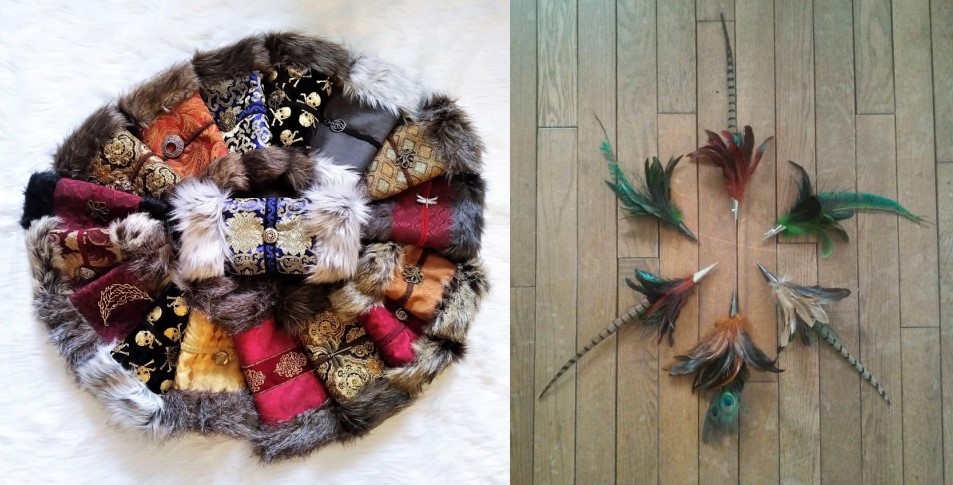
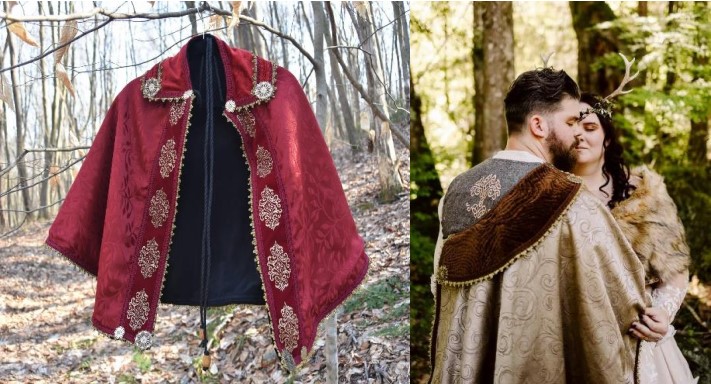
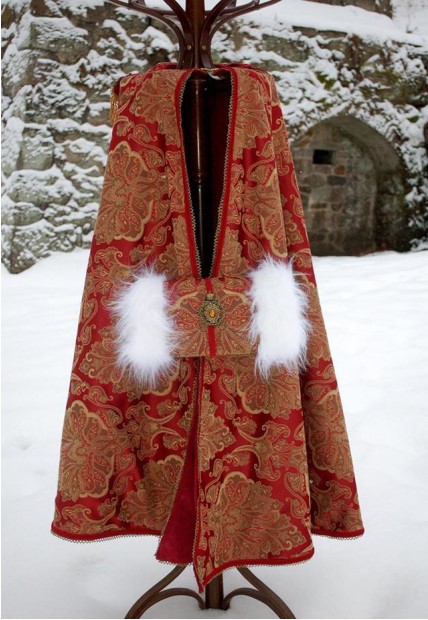
Jeff: Gifting. I blame gifting and also the simple idea that if I really wanted to have something to wear at Faire, I could settle for what everyone was making or create my own. Sure, you can do work for hire with many talented renfaire costumers but there’s definitely something to be said about wearing your own creations. One holiday season after making gifts, one of my friends told me, “You should be selling these.” The statement became reality, and I started up an Ebay shop. A few years later, I added an Esty shop. I don’t do full garb unless it’s for myself and primarily my items are hats, capes, handwarmers, feathers and sundry other items. I have no exact count, but I am sure that I have sold more than 1.5k individual items online.
You do all the cutting and sewing – these are all custom, hand made, one of a kind creations?
Jeff: Mostly, these are based off of one pattern I created for each item, so some are one of a kind and others are not. Hats are usually one style in one material and different sizes. Simply, makes sense to cut more than one at a time. The capes and handwarmers are in between, I’ve made some exactly the same, but most have some small differences if they are of the same material. Different ornaments or trim can set them apart. I have also done custom pieces upon request. There have been several capes specifically for weddings and even a whole wedding party. I once made a hat for a sculpture of Martin Luther for a customer. The best was a set of red capes for a production of Volpone by the Red Bull Theater in New York. There needed to be two because Hamish Linklater was in New York and Andre de Shields was in L.A. and since the production was done via Zoom, they needed to appear to hand the cape from one character to another.
Do you have a favorite piece that you’ve done? Or, one that you really didn’t want to let go of?
Jeff: Back to gifting once again, my favorite pieces have been given away. I made a full-length cape and handwarmer set for a friend, a capelet for another and a fighting cape for a third. Since they were gifts, I was willing to try different things and spend more time on them and was happy with the results.
Do you have any pieces that have surprised you or given you a special reaction from the customer?
Jeff: I am always surprised when people send me pictures of themselves wearing the items. Sometimes it’s as simple as a hat completing a costume that obviously took a lot of work on their part. I love being at faire and suddenly realizing that someone just walked by wearing something of mine. Doesn’t happen a lot but it’s awesome when it does.
A very big thank you to Jeff for sharing his story with us! Head over to the shop and check out all the options!
This was originally published in Watch The Skies, March 2024.
The Bag Lady
Continuing to dig into the wealth of talent that lives among our members, I had the opportunity to chat with Pam about her fabulous bags! Dame Dahlia Creations is the real showcase of her work, but I wanted to get more detail, so we did an interview!
How would you describe what you do? I mean, you’re essentially a handbag/tote creator, right? You do all the material cutting and sewing?
Pam: While I don’t design my own patterns, I do everything else. I select the fabric/material based on what the individual wants or somethings if I just find some really cool fabric and get inspired. I cut everything out and sew it all together. It can take anywhere from 10 – 60 hours to make depends on the pattern. Certainly a labor of love.
How did you get started doing this?
Pam: I started sewing about 7-8 years ago making costumes and fun stuff like that. Then I started making retro inspired dresses. 40s, 50s, 60s styles. I was having a hard time finding handbags to match the outfits. So I looked for some patterns and found some and just started making them. I’d post on my personal Facebook page the different bags I was making. My friends kept commenting asking if I made them to sell. When my husband was going through cancer treatment, it gave me something to focus on instead of just taking care of him.
[do you want me to include that last bit?]
Pam: Sure you can. When going through something like cancer the caretaker has to take care of themselves as well. Having a hobby or something to focus on instead of the ick that is cancer is important
Do you have a favorite piece that you’ve done? Or, one that you really didn’t want to let go of?
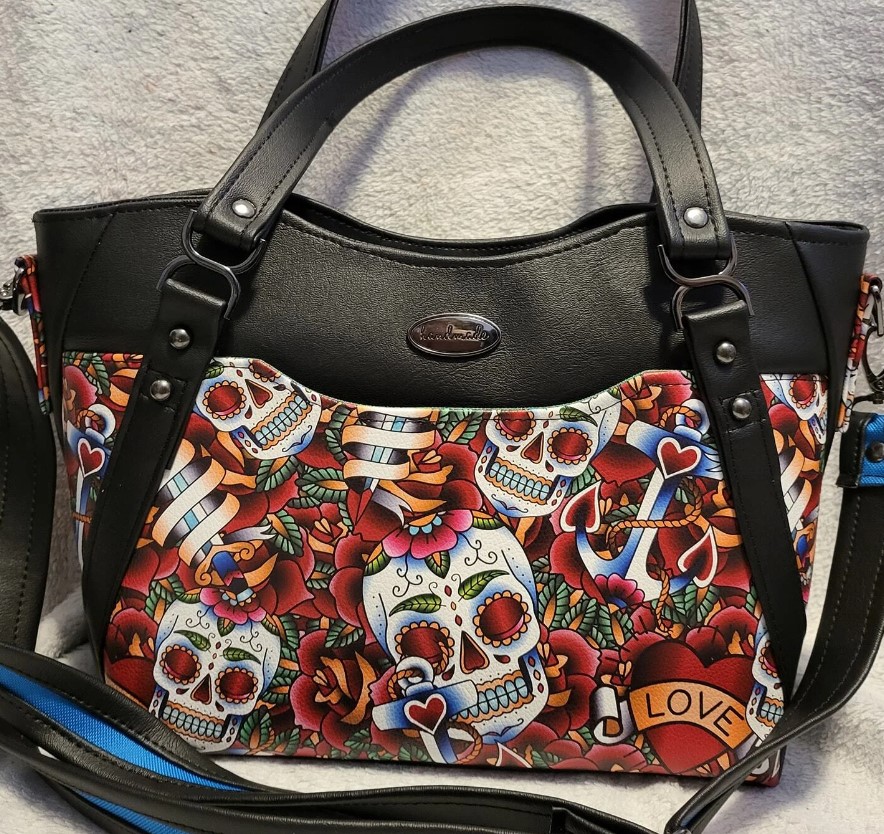
Pam: I have several but the one that really sticks out is a sugar skull one. I just loved how that one came out. The woman who bought it was so excited because she just loves sugar skulls and well skulls in general. In fact the dress she was wearing matched the pattern on that bag pretty well so it went to the right home but part of me was sad to see it go.
What is your favorite part of the whole process?
Pam: Seeing it really start to come together. That particular bag has 45 individual pieces. It’s difficult to see how it will actually come together. Finding all the little fun things – like zipper pulls to match. Then seeing the person’s face when they see it done. Seeing the person’s face when they see their custom bag makes all the work rewarding.
A very big thank you to Pam for sharing her creations with us! Be sure to head over to her site and check out all the fabulous things she makes!
This was originally published in Watch The Skies, January 2024 issue.
For a couple of years now I’ve focused my written pieces for Watch The Skies on films and television. While that sort of entertainment is wonderful, I feel that we need to shift from film to other forms of art. As a group, science fiction fandom has some of the most imaginative and talented creators anywhere. If there’s a way to create something, they’ll find it. If it can tie in with a favorite book or show, so much the better.
My hope is to get some of our members to show off their creations here in the fanzine this year. I would love to see what other folks are making and how it’s related to their fandom.
I’ll go first! Normally our group sees my artwork on the cover of the ‘zine each month. That isn’t the only form of art I create. I draw, paint, model and craft as well. As part of an online crafting group I was able to enter a contest for the creation of a “magic potion”. Using a bottle and a number of other supplies, I was able to create the “magic potion” Release. It’s a real, full size bottle with sculpted pieces, painted glass and hand sketched parchment. While it didn’t win the contest, I was really pleased with the results.
It’s a sportsball sounding kind of title, but it doesn’t make it less true. Sometimes when you’re in a slump or you can’t seem to shake out of a rut the thing you need is an easy win. Take on something that’s not part of your regular list, your massive project or the thing you’re blocked on and just do something smaller and less stressful. Take the easy win.
That worked for me. I went out and watched the **ULTIMATE** newbie crash course. I don’t know that I’m a total newbie, but I’m always happy to look at videos talking about basics. The foundation or fundamental pieces that crafters start from are often very different from each other. I don’t necessarily follow all the terrain advice shown in Wyloch’s Armory, but there was a bit in that video that reached me. Quick and easy doors.
I hadn’t thought about doors in dungeon terrain specifically. I’ve got grand visions of foam mountains and elaborate set pieces with months of build time involved and it all just seemed to be a bit overwhelming. I needed to step back and take on something smaller and easier in order to get into the work. Doors. The video series creator has a really great take on using a flat washer and some smaller craft supplies to create these doors. I stopped by the hardware store on the way back to the house one day and dug in.
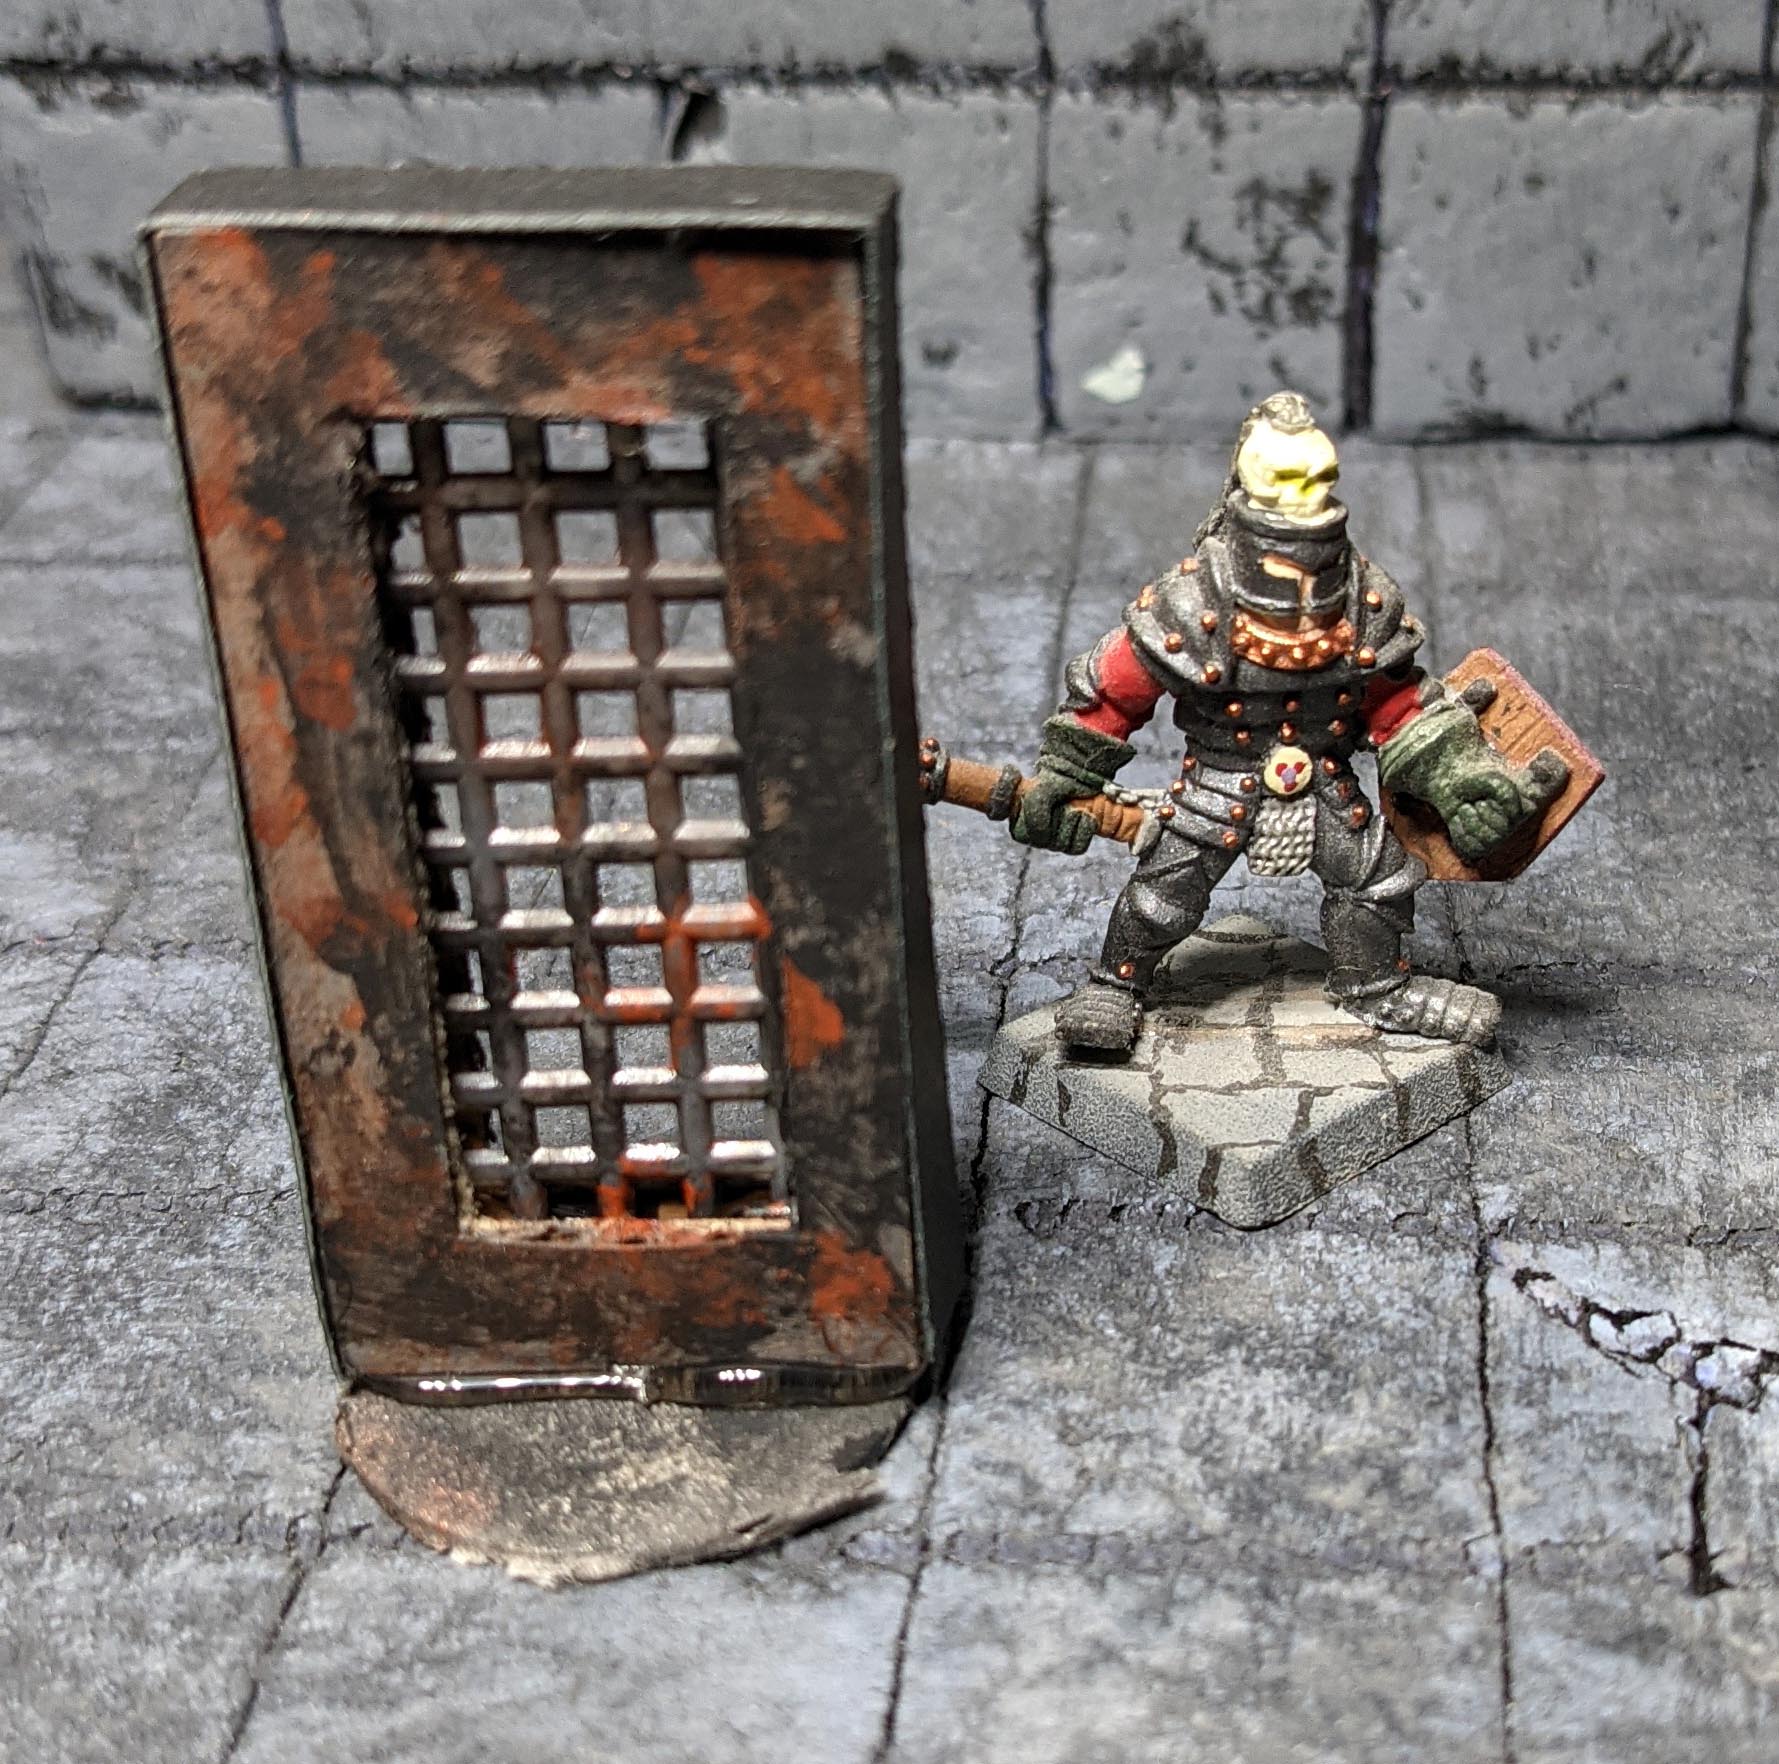
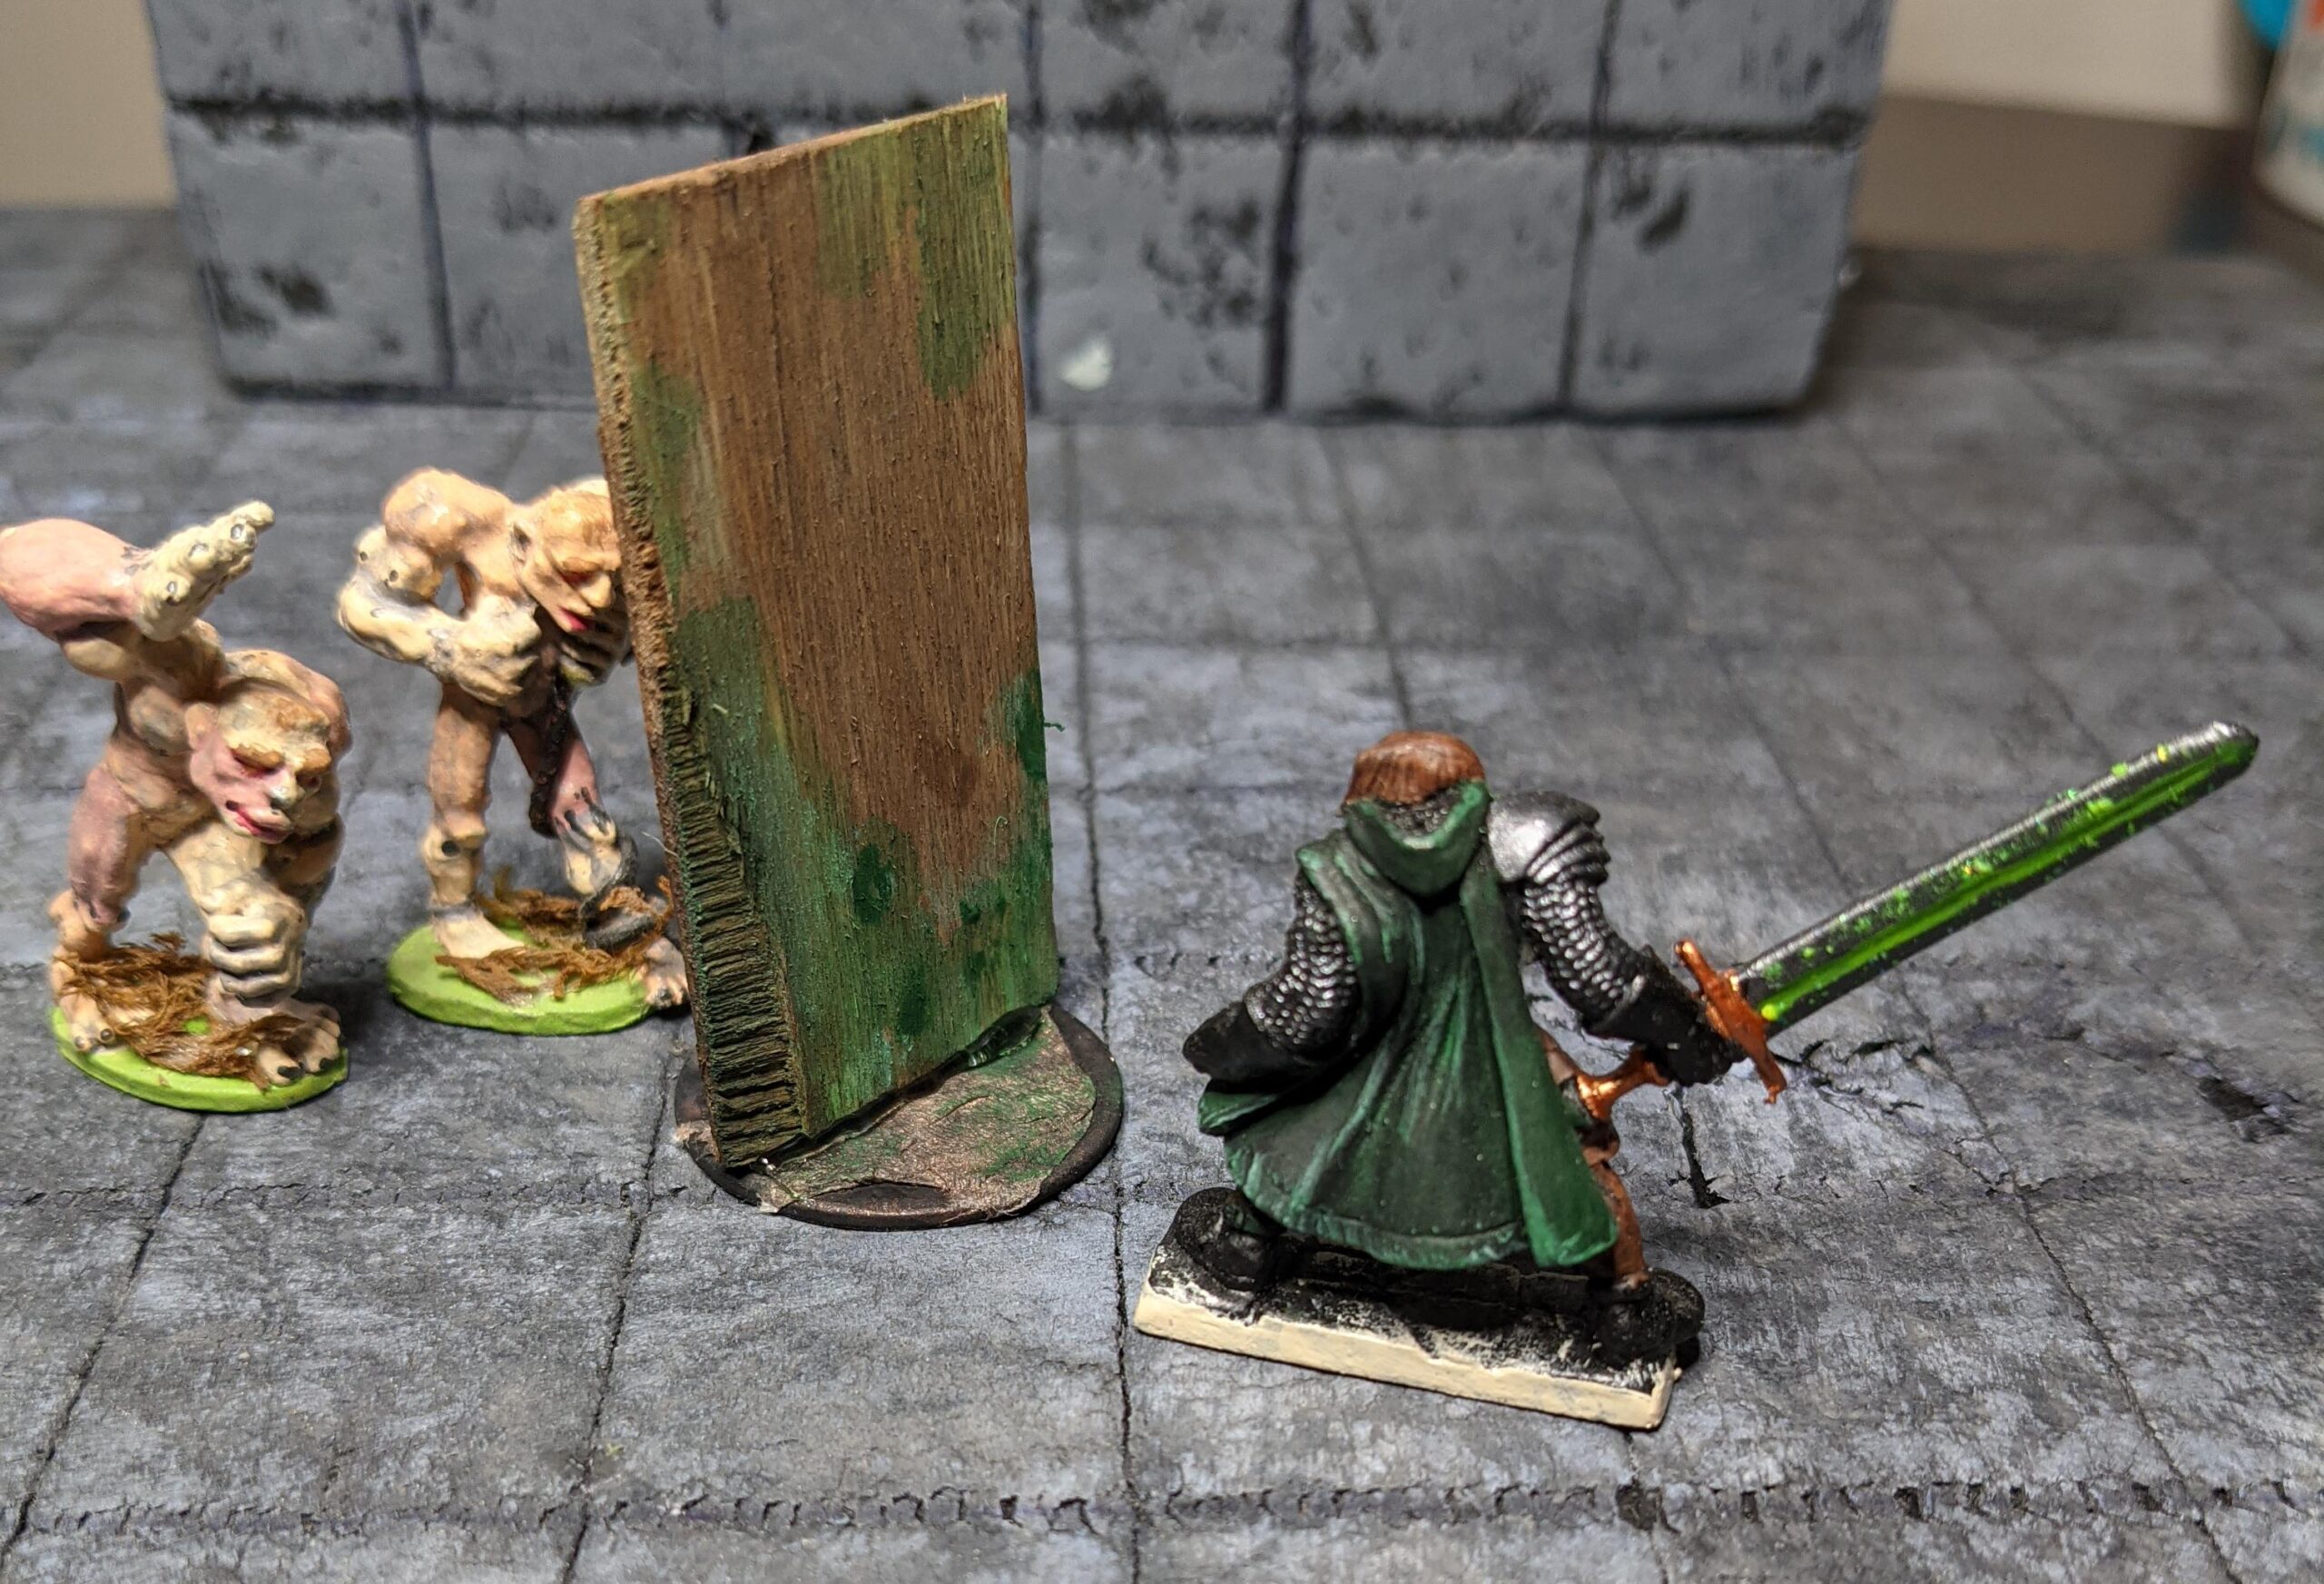
I did not stick to the pure basics as shown in the video, but used the simplicity of the design concept to push forward a series of doors that I could use to advance a story. I was really happy with the result and at the end of the afternoon I had nine pieces I could add to my terrain library for future use. I didn’t grab pictures of all individually, but here are a couple of my favorites:
The Collection
Rusty Cell
Rotten Core
If you’re stuck or have writers block or can’t figure out what to paint or build or whatever your hobby is – sometimes it can really help if you take the ‘easy win’! What sort of things fit this description for you?
I am not a professional. I am not a professional. This is just a hobby.
I need to keep reminding myself of these things.
I have been working on a miniatures / craft / terrain project for a while now and it is consuming a significant amount of my time and creative energy. I went big right away. Really big. Doing all kinds of things that are well outside my known abilities and comfort zone. I have to remember that so many of the videos I see on line are, in fact, professional artists or crafters. They’ve got years of experience and they get paid to do what they do. There’s a reason they’ve got a new thing every week. There’s a reason they’ve got thousands and thousands of followers.
I am not them. I am forging ahead with my ONE project and when it is done I will move ahead with the next one. It’s a hobby. I CAN learn to be patient (and actually finish an entire project).
Here’s a sneak preview – the black skeleton of it all:
Release the Kraken! Or the craft. You know, if that’s better for you.
One of the great parts of social media is that it allows people with similar interests to connect with each other (this can be a big downside too, but that’s a different discussion). I’m super happy that I found the Tabletop Crafters Guild group to be part of. There are some amazingly talented people there making inspirational works.
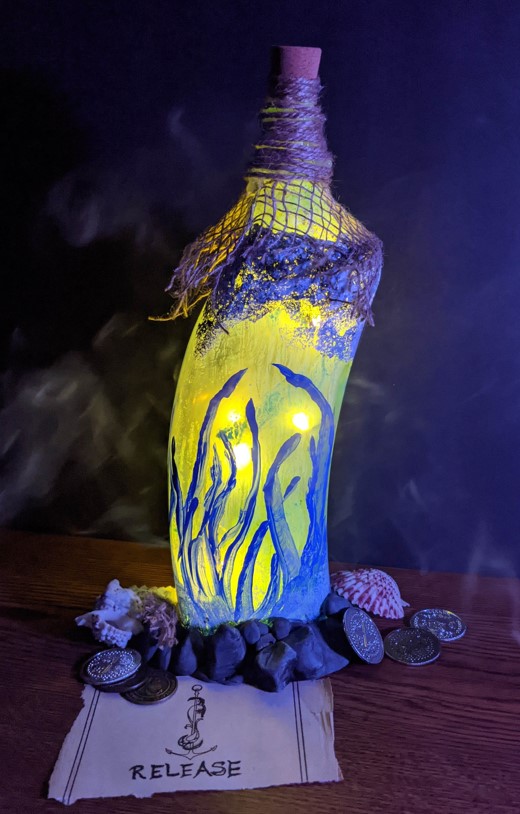
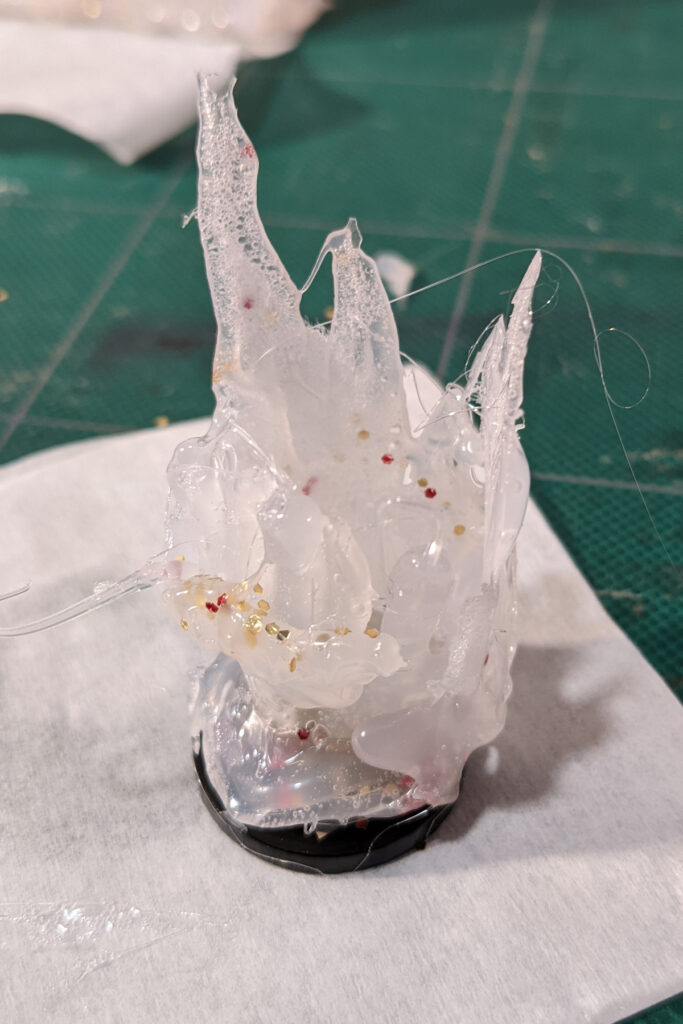
This group, for any of my readers not familiar with them, also runs contests for members on a regular basis. I saw the build contest for the September/October time frame and thought I would try my hand at entering a contest there. A single, life sized prop of a potion bottle – not allowed to use dice in the build. While I didn’t understand the dice restriction, I went with it. I have a handful of old bottles saved up. My wife and I have made a few different crafts with them over the years, so it was just a question of finding the right one and then working up some inspiration. Contact the muse. Get a really good idea and run with it…
OR
Stare at glass thoughtlessly for far longer than I should have. I do love sparklies.
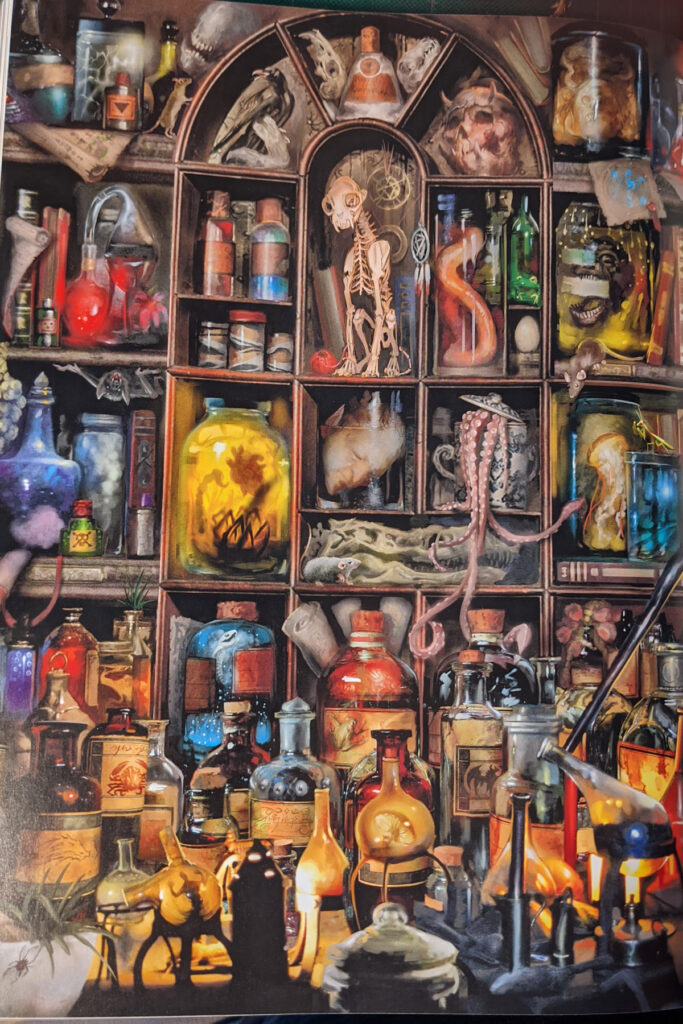
I was reviewing various artwork and reading up on a few things game related for a show I was going to be part of when I came across this full page piece showing a wizard’s shelf of wonderous things. It may truly have just been a muse poking my noggin at just the right time, but I saw tentacles crawling out of a jar in the middle of that art. A horror / nautical thing would be just the ticket.
Inspiration!
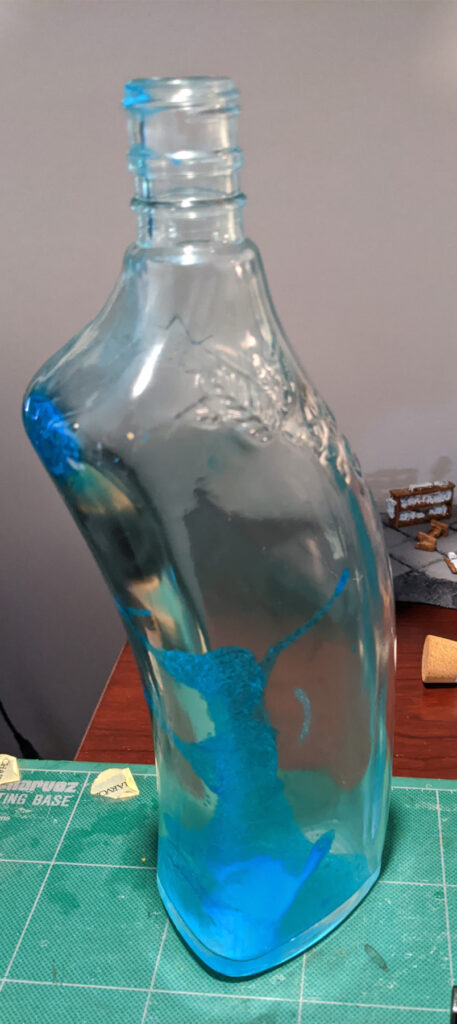
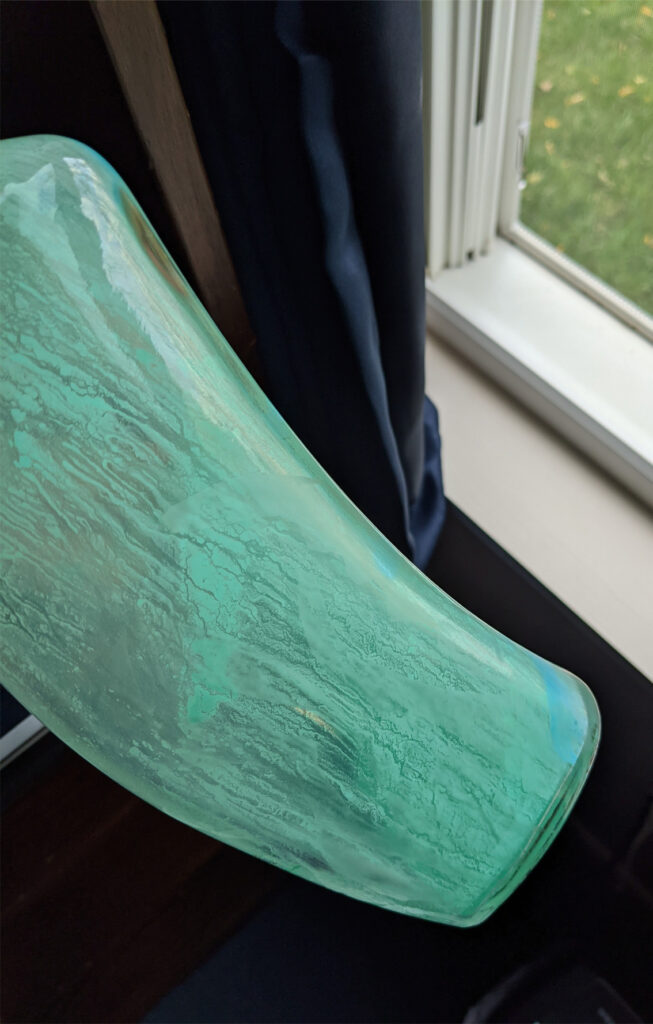
I rummaged around the place and found this old bottle with a distinct curve. Waves crashing, getting that lean to one side. I grabbed some ‘goo gone’ and started scrubbing it clean. Once it was completely dry I wanted to give the clear glass a tint from the inside. I’d seen this concept on a YouTube channel. Mix some water, a little food coloring and some glue. Make the mix just viscous enough to coat the inside of the glass container, then bake it at a low temp for about 20 minutes.
Post oven coating-ish
Sometimes listening to YouTube is helpful. This was not one of those times. I can’t all is a total fail. The boiling remnants of that past bit gave the corner where everything settled a nice blue – that was mostly not dry. I would not be put off. I decided that some glue and craft paint might do the trick, so I whipped up a yogurt cup size mixture and poured it in.
Paint-glue crackle sort of fail
Here’s the thing… the bottle has 4 sides being relatively rectangular, and we here on Earth have gravity. The mix just slid to whatever side was down. Also, the stupid oven coating must have done something because the mix wasn’t really sticking. What it left could, maybe, if you were out of focus (squint I tell you!) say it was a misty splash of a wave on the inside of my nautical theme potion.
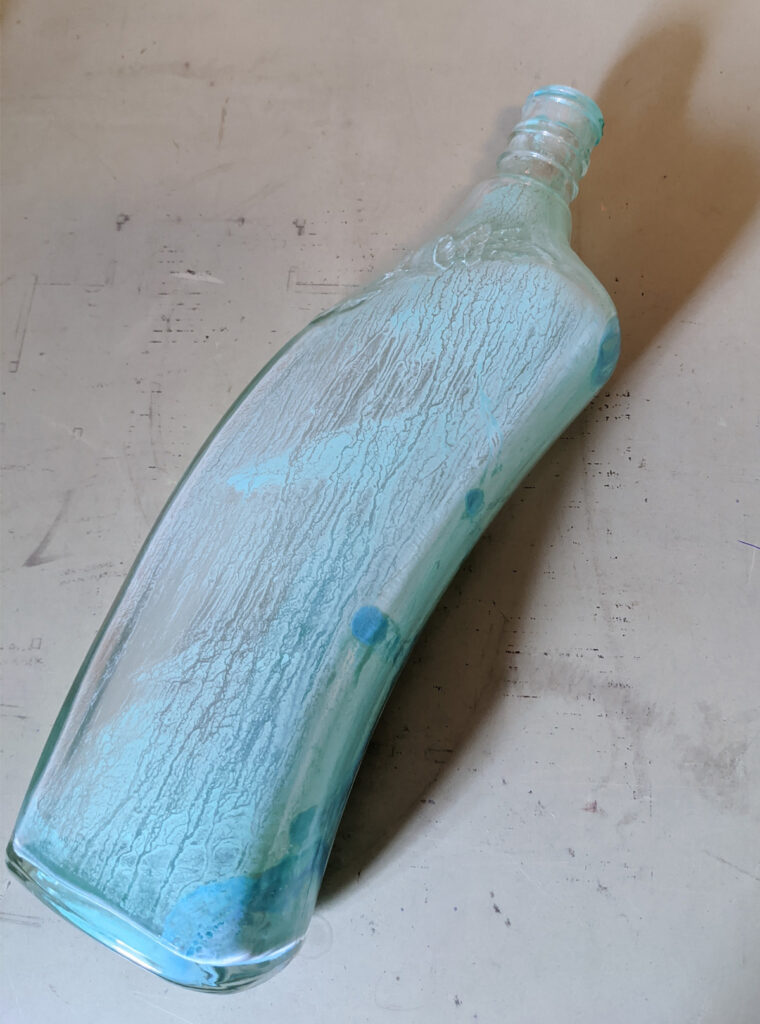
FINE. I have some glass etching paste for the next step. I can work with a vaguely blue interior. I grabbed the vinyl contact paper and masked out waving tentacles around the bottle. I would have backlit waves with frosty glass etched tentacles and we’d be fine… or not. I couldn’t find any of the gloves we have in the house. None. Anywhere. I’m not about to chance the burns with acid etching paste. Wait! Rubber cleaning gloves – there are some of those under the sink. Sized for my daughter. I couldn’t even get my fingers in. Working to keep the frustration from my voice, I asked my lovely daughter if she’d be willing to help me in my crafting endeavor by applying this paste for me. Happily she agreed. Donning mask and gloves she spread the paste all over the bottle. We followed the wait time on the directions and rinsed it off. Nothing. No visible effect.
Can you see the etching? It *is* there. Sort of.
Undeterred, we still had all the gear out, we went for another round. This time I directed her to smear the paste on much thicker. We waited longer before rinsing it off. Maybe. Maybe there was some etching going on. I don’t know, I sure couldn’t see it or feel it. Another fail.
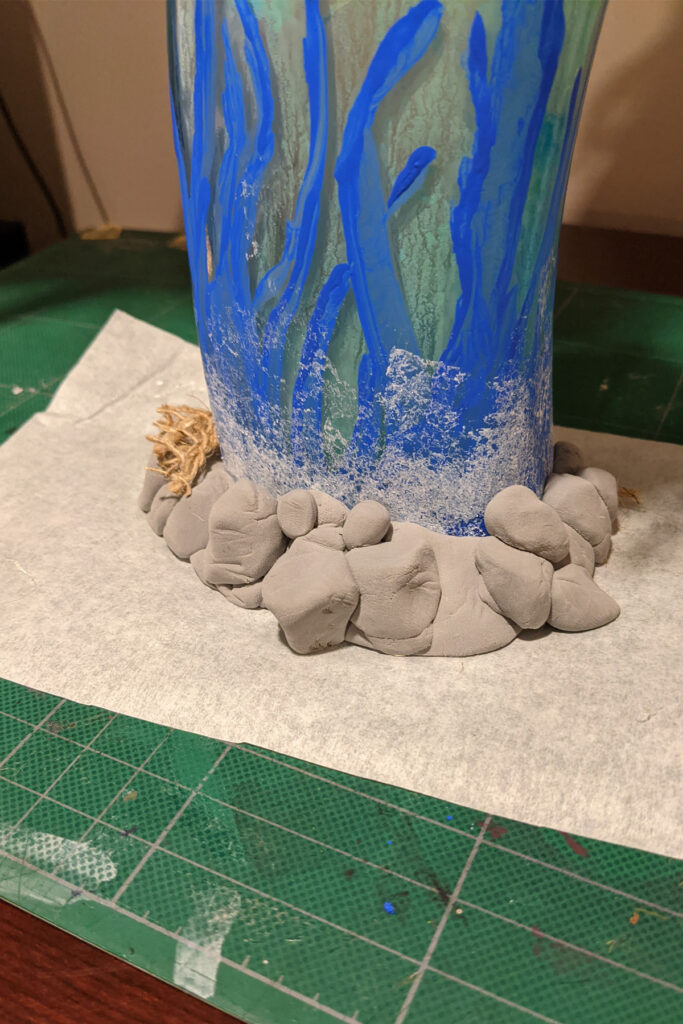
I moved on to paint. I can paint tentacles and waves and clouds, it’s fine. I grabbed up the craft paint and went to work.
I used air dry clay from a kids brand to model out the rocky coast where this bottle would be set. It was fun to model the clay. Air dry was needed because I couldn’t exactly bake this creation anymore. And then the air wasn’t dry. Seriously. So humid here (hurricane season! Shakes fist at sky) that the clay didn’t dry for painting even after a day. It wouldn’t bother me so much except that I know the next time I go to use this clay it’s going to be hard as a rock – even inside the air tight container I put it in.
The rocky coast pre-painting
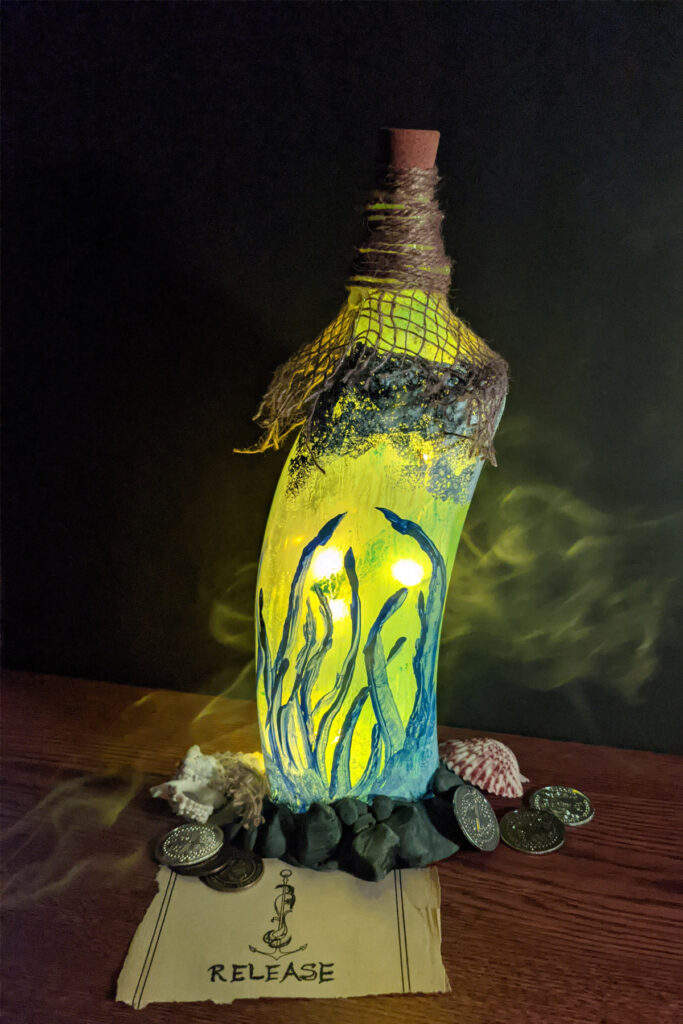
I forged ahead. I had an old, rechargable set of LED lights attached to a cork that would be just the thing for a creepy background. I’d charge them up, pop the cork in and the light would help the whole thing…
sure it would. IF the cork actually fit – and it didn’t. Wrong size opening on the bottle, too small.
Back to the ideas part. I needed something nautical… burlap netting. That would work. Add some hemp like cord and just wrap the top of the bottle high enough to cover up the plastic of the LED connection and fake that the cork is actually in the bottle. Cool.
Then to grab the costume tentacles from my daughters Halloween collection. They were the ones that fit on the ends of your fingers so you could make a handful of tentacles wave with your fingers. Will wrap those up around the bottle for effect…
See where this is going yet? Thwarted again. Those costume bits were gifted off to a friend some time ago. No tentacles.
I did have a few, smaller pirate type pieces I could add. I would do that and wrap it all up. I tuned down the lights and bemoaned that I couldn’t make a misty effect to go along with the haunting yellowish green glow. My lovely wife just said, “incense”. Then she proceeded to light a couple of sticks up and waft the smoke across my little scene while I did pictures.
My contest entry – “Release”
In the end this contest entry looks very, very little like the vision in my head. I am however much happier with how it turned out than I thought I would be given how many times my plan just didn’t work. At the time of this writing I don’t know the results of the contest. I have seen some of the competition and they look great. I don’t really expect to win, but there’s always hope right? Even without a ‘win’ in contest terms I will consider this a ‘win’ in learning and experience. I’ll take the things I learned on this project and apply them to my next project. Win, lose or draw, absolutely worth entering a contest.
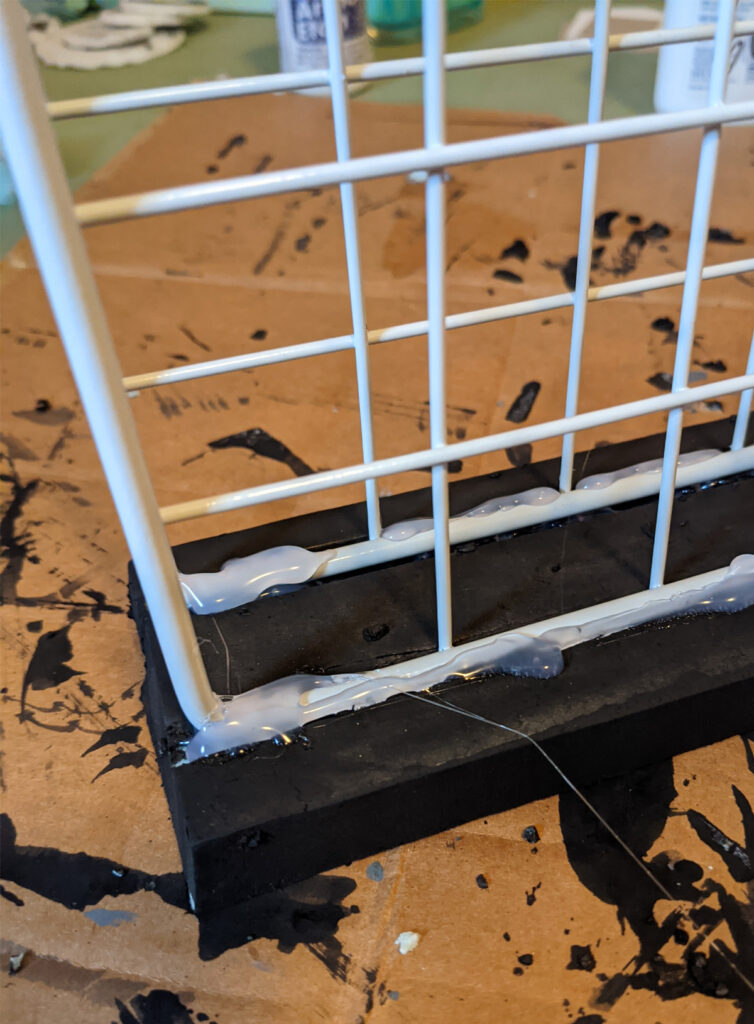
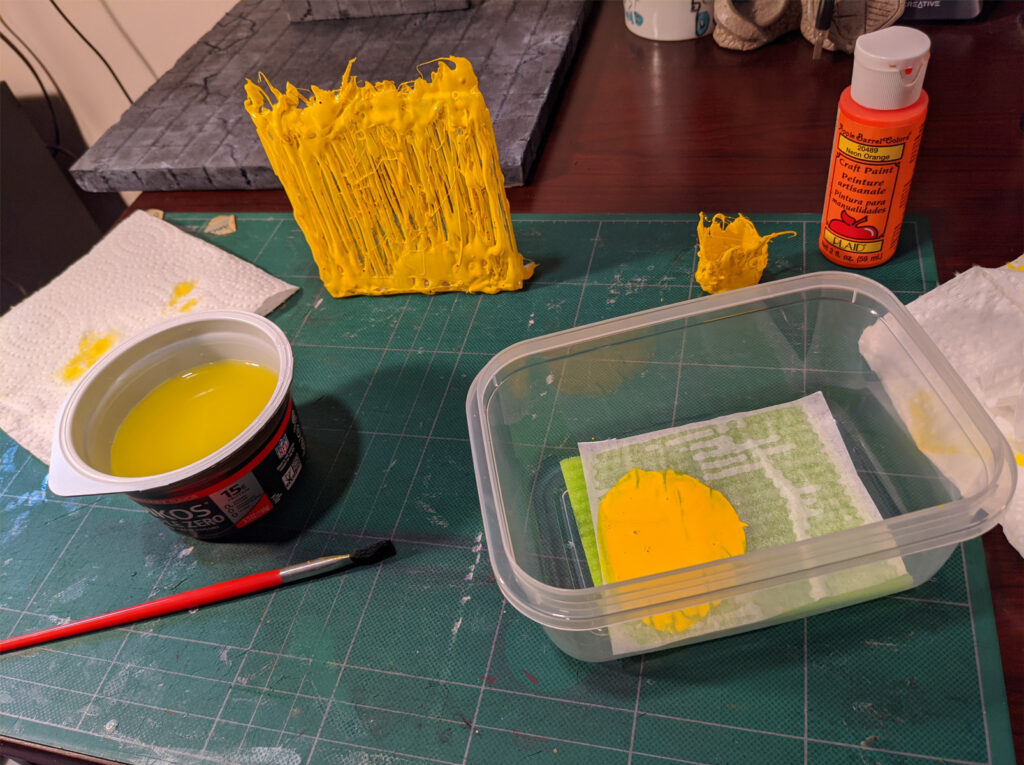
I have been side tracked lately with a lot of projects / work stuff that amount to not doing the stuff I really enjoy. One of those things I really enjoy is painting. I have a fair number of acrylic craft paints that come in these little round tubes. They can be a challenge to store in an easy to see and access way.
We had this wire rack system from years ago. My wife saw a video that showed a great way to reuse some of the panels from this “build it yourself” paint rack display. To be honest, we still have a number of these in use – they are shaky, but standing and holding some lighter weight things. We did have some leftover panels. Time to make a paint rack!
I watched a couple of videos that gave variations on how to connect the two wire bits in a way that made sense for hanging or mounting the rack on the wall. I don’t consider my art supplies to be art in and of themselves most days. I wanted a “floor mounted” model if you will. I was also not a fan of finding properly sized plastic pipes in white, finding matching caps or any of a list of other things. I wanted this to be something I could do at home with what I had on hand.
I needed a spacer that was about the right size and stumbled onto a video where the woman making her version of the rack used a child’s alphabet blocks. I didn’t have alphabet blocks anymore, but I did have a scrap chunk of lumber. I grabbed the saw and cut some little blocks (about 1” or 2.5cm). How to hold them? Zip ties of course. I drilled a single hole through one corner of each block and fastened it once in each direction (up/down, left/right) for stability. Spacing achieved!
Sanding and painting would probably help the blocks
Next up was the other side. My initial thought was to make a solid wood piece, but my woodworking skills and tools have a very low limit. Cutting and drilling was about as far as that was going to go… BUT I have XPS foam! A-ha!
So I carved up 2 slabs of foam and cut grooves into one side. This is one of those times when I wish I had a hot wire cutter for the foam. Doing this by hand with a hobby knife was rotten. It’s gouged, uneven and not pleasing to the eye. I wasn’t overly worried as the grooves should be on the side you wouldn’t normally see. I painted them up and waited for them to dry. I still hate waiting.
A hot wire tool would have made this so much better!
Next step – attach the foam. What to use? Hot glue. It’s what I have and it shouldn’t need to stand up to a ton of abuse. I should just need to make sure the top edge stays in place. Once the glue was dry, done!
I should work on my glue gun aim too…
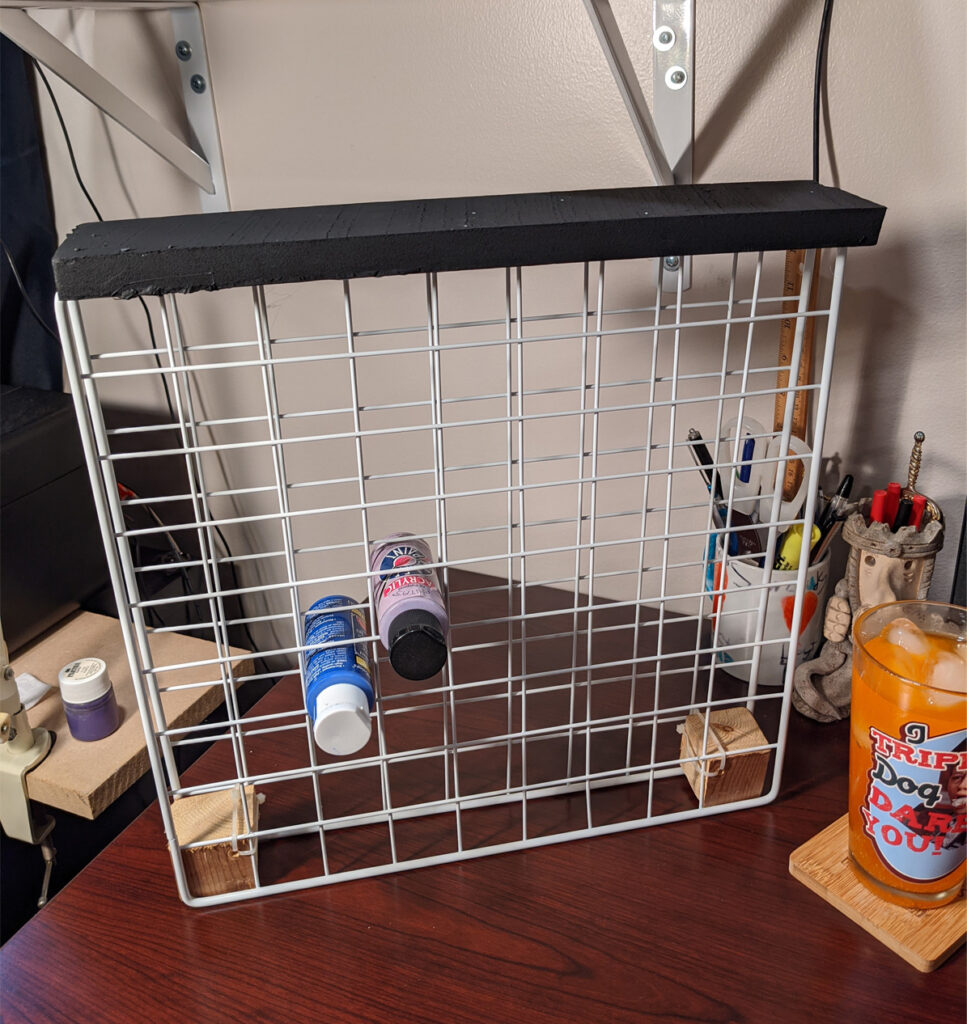
In practice, when my wife started filling the paints in the rack fell over. She was not pleased. The position as shown in the picture is less than effective for actually standing up while holding paints. Solution? Turn it over. So, the smooth black painted foam is now on the desk acting as the stable foot and showing off all the nasty glue work, the parts of the foam that didn’t get painted right and the unfinished side of the wood block. In the end it is not about the look of the this rack, it’s about the function. Now I’ve got a pair of paint racks that will hold the majority of my paint collection at almost no cost ~ and I didn’t have to leave the house.
Right side up – as intended, not as in use LOL
Onward to the next project! What are you working on?
Army of Darkness still makes me laugh. Faking the words of the ceremony was hilarious. “OK then. That’s it… I said the words, I did!”.
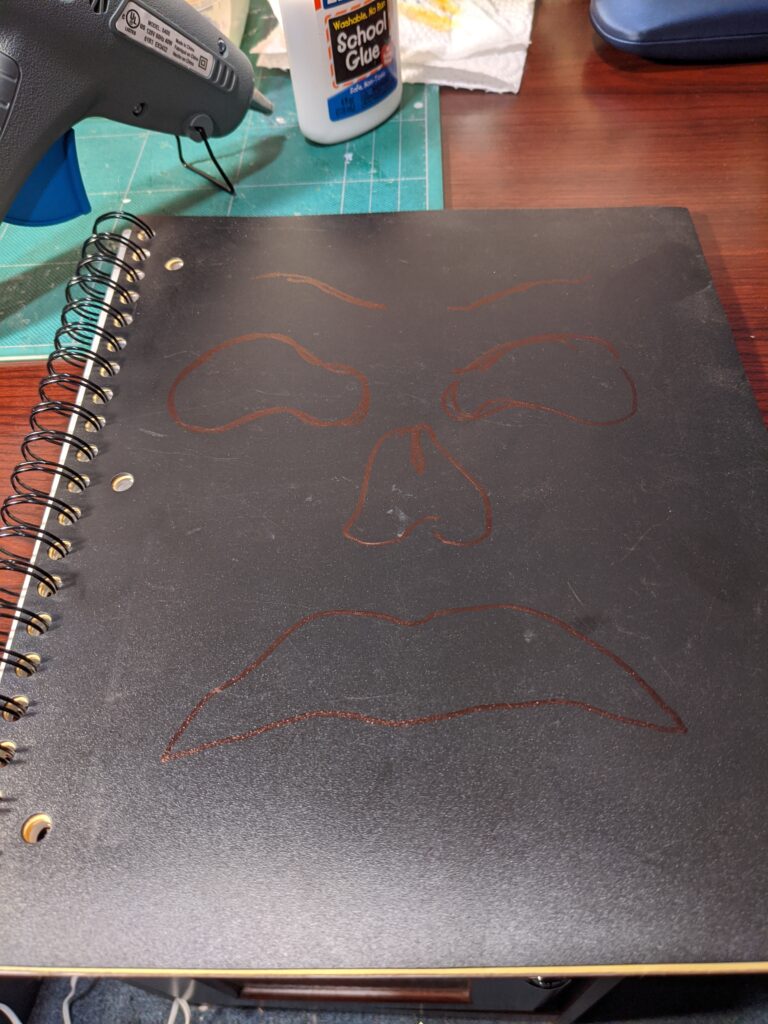
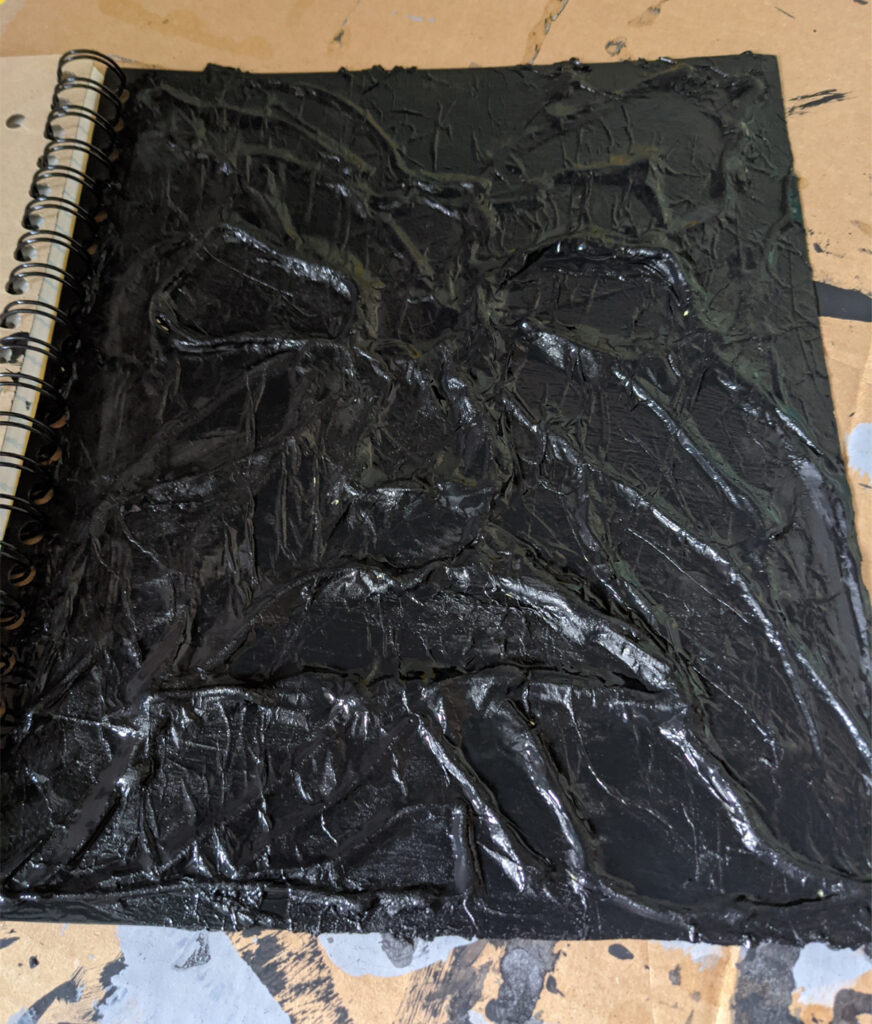
There’s a very small YouTube channel out there called ‘Worlds of Waynecraft”. I stumbled onto the page when I was wandering through videos one day and discovered this fun looking craft. Make YOUR notebook look like the Necronomicon. It’s really a lot easier than I thought it might have been.
I started off by drawing the rough face outline onto the cover of the blank notebook I was setting up.
Freehanded a face!
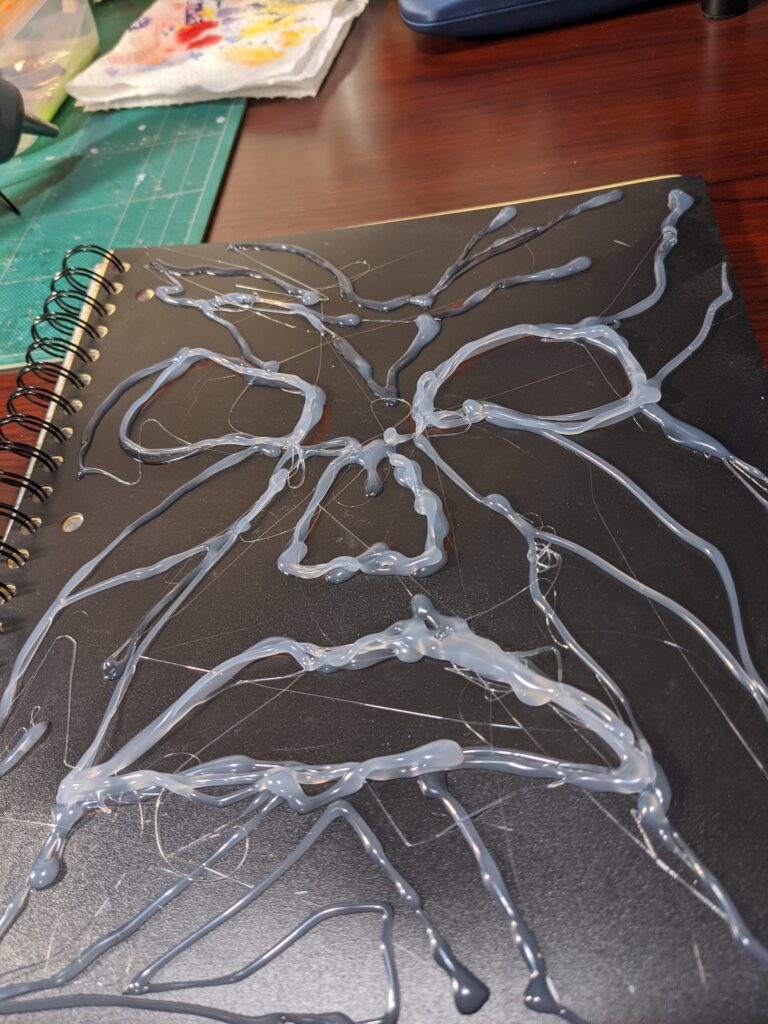
Once the lines were in place where I liked them it was time for the hot glue.
Hot glue… keyword is still HOT.
I used two or three layers over each line to give some emphasis to where the main portion of the face would be. I forgot to photograph the next bit. Essentially mix up a half and half water and glue wash ( I used regular old school glue) and tap layers of tissue paper over the entire page. Don’t worry about being neat – you’re looking for wrinkles.
Once I was happy with the look I had to let it dry. It took forever… and I’m not patient. As soon as it was even close to dry enough, I took a slightly thinned layer of black acrylic paint over the whole thing.
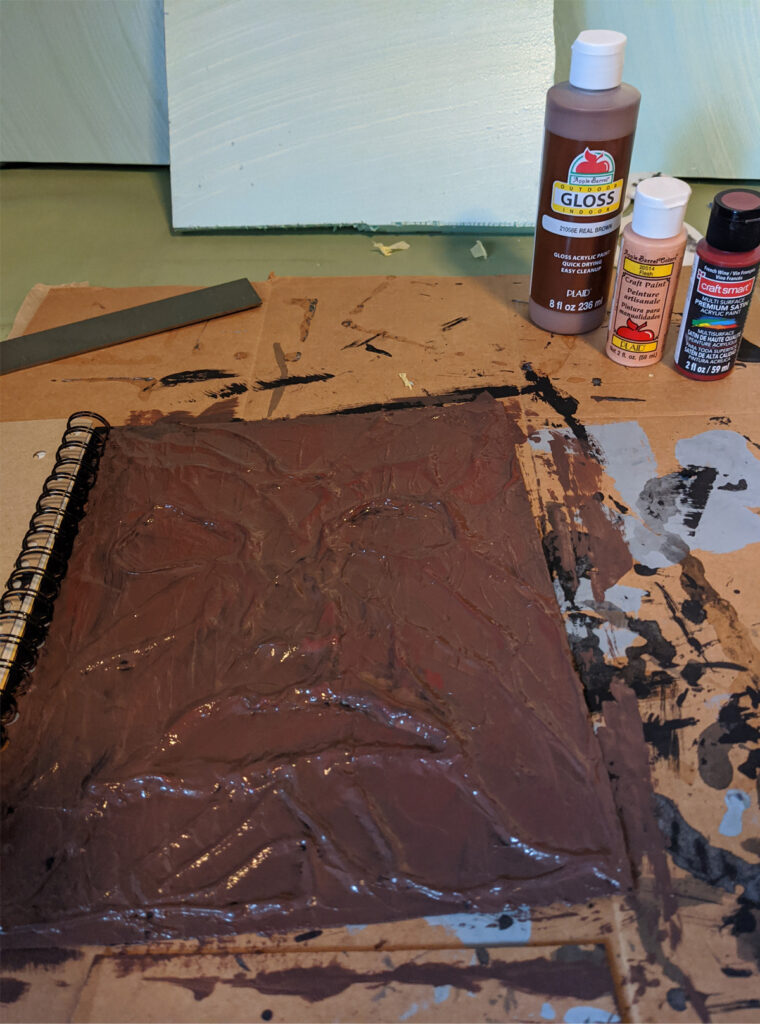
Once that dried (OMG FOREVER) I mixed up some brown, red and flesh color to paint over the black. I could be pretty loose with the whole thing because if any of the black showed through it wouldn’t be a big deal.
Craft paint!
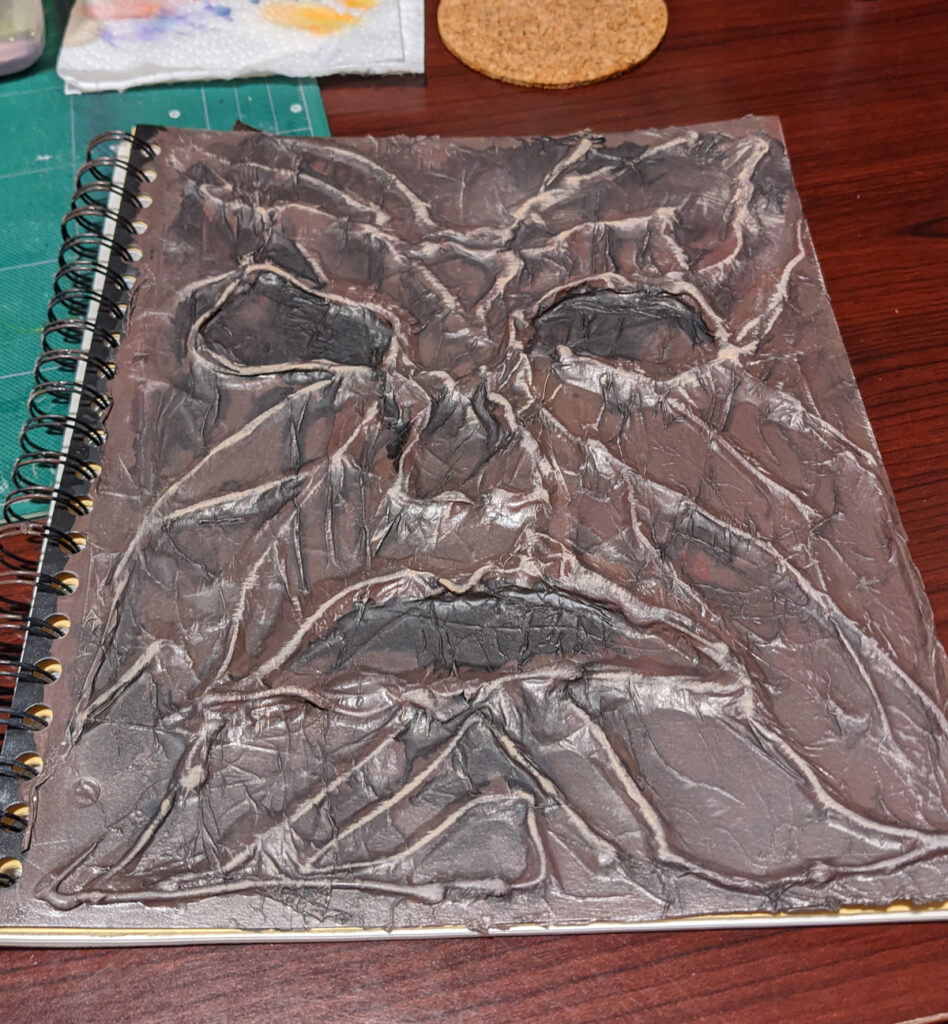
Let it dry again, then dry brushed a light tan / fleshy mix over the high points and the wrinkles. Once that was dry, a light black wash to get some shadows back in the eyes and other places. I am actually pretty happy with the results.
Ready for notes!
Taking some words from an inspirational friend of mine, “Despite everything, create.”
I have a lot of actual work to do. I have 2 deadlines for edits that I need to hand in and some website work I need to do to get my site here cleaned up a little. Add a couple of professional touches that I am missing. I just wasn’t feeling it today. As happens so very frequently of late, I couldn’t sleep. My body is still in rebellion about something with aches, pains, and lots of other unpleasantries. So when I finished my second cup of coffee this morning I decided that some crafting was in order. Take on a small project, finish something and see if that would help.
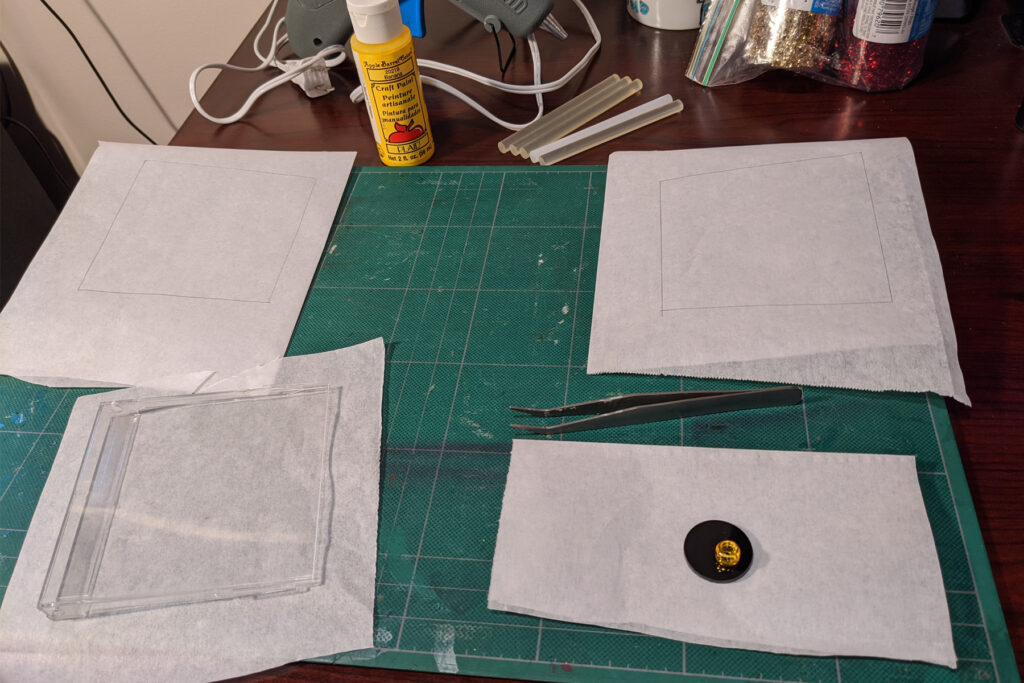
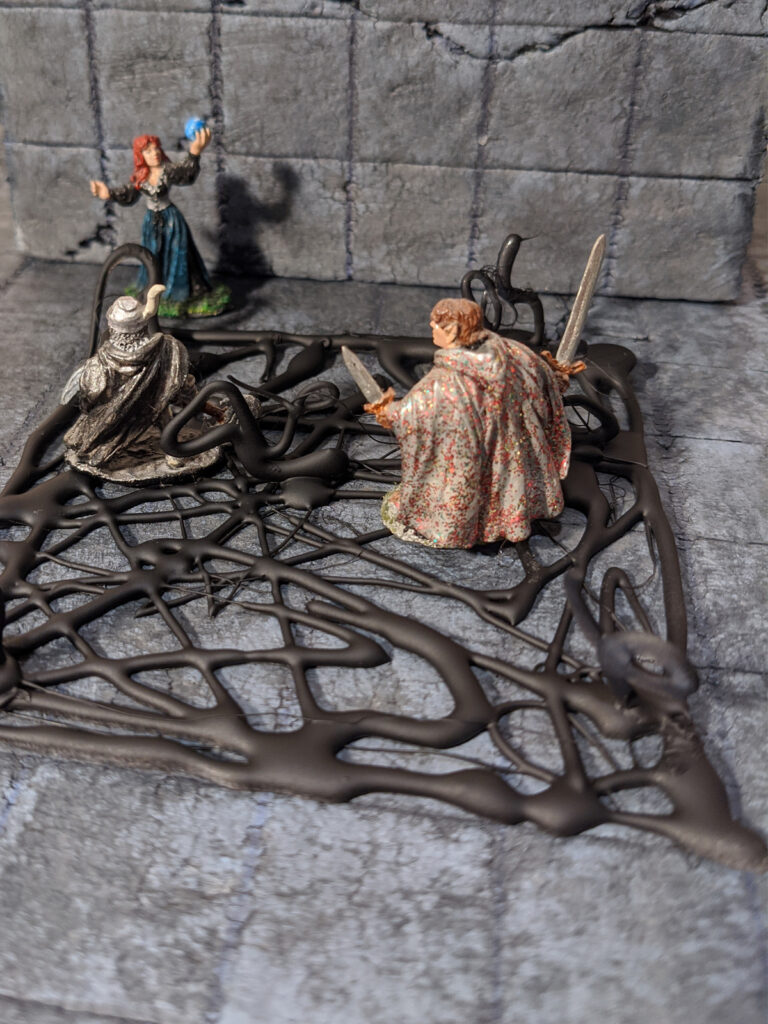
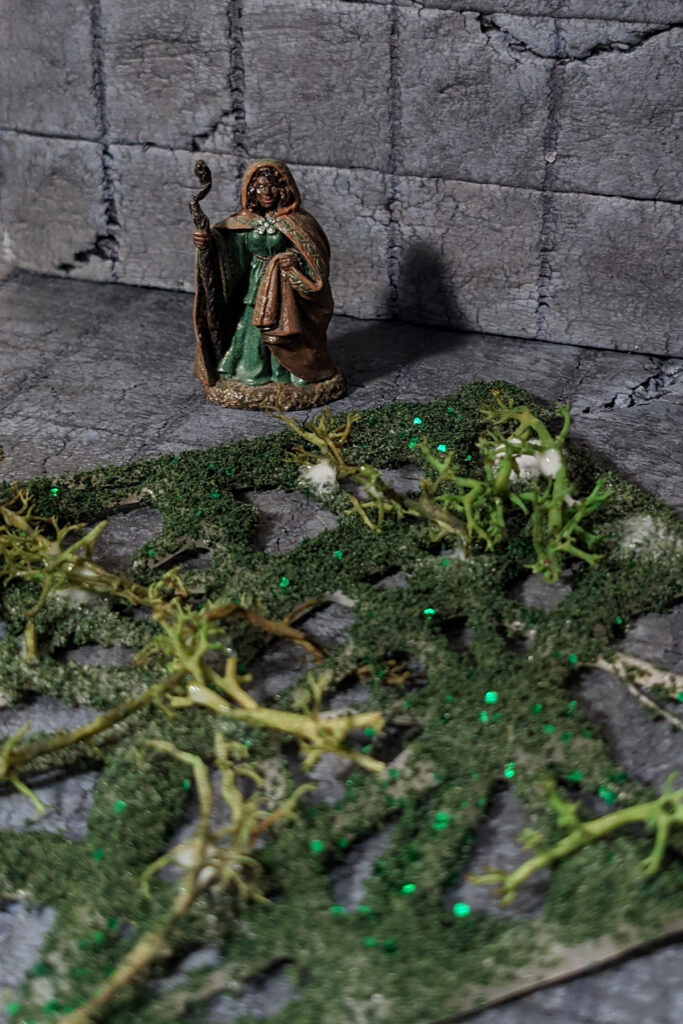
My project of choice today was creating area of effect / spell effects for my D&D game. I picked a handful of spells and set about trying to make them in a form that we can just drop on my shiny new dungeon tiles next time we get to play.
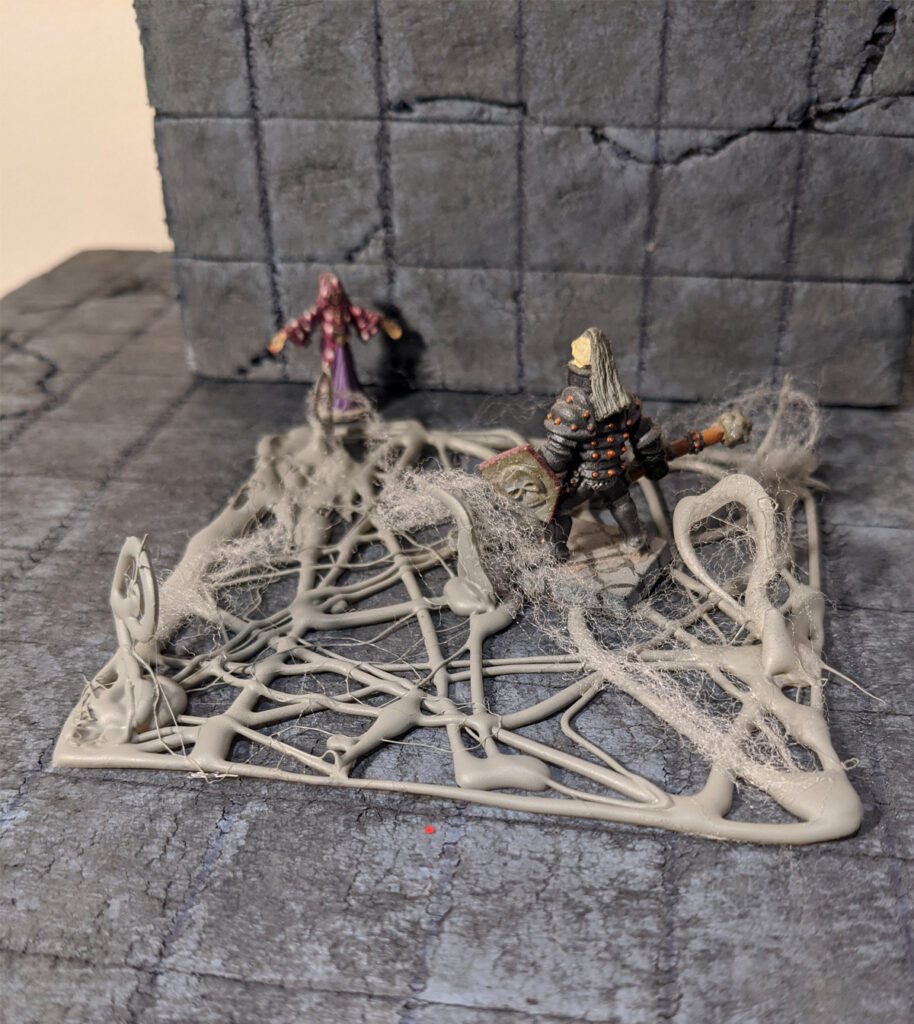
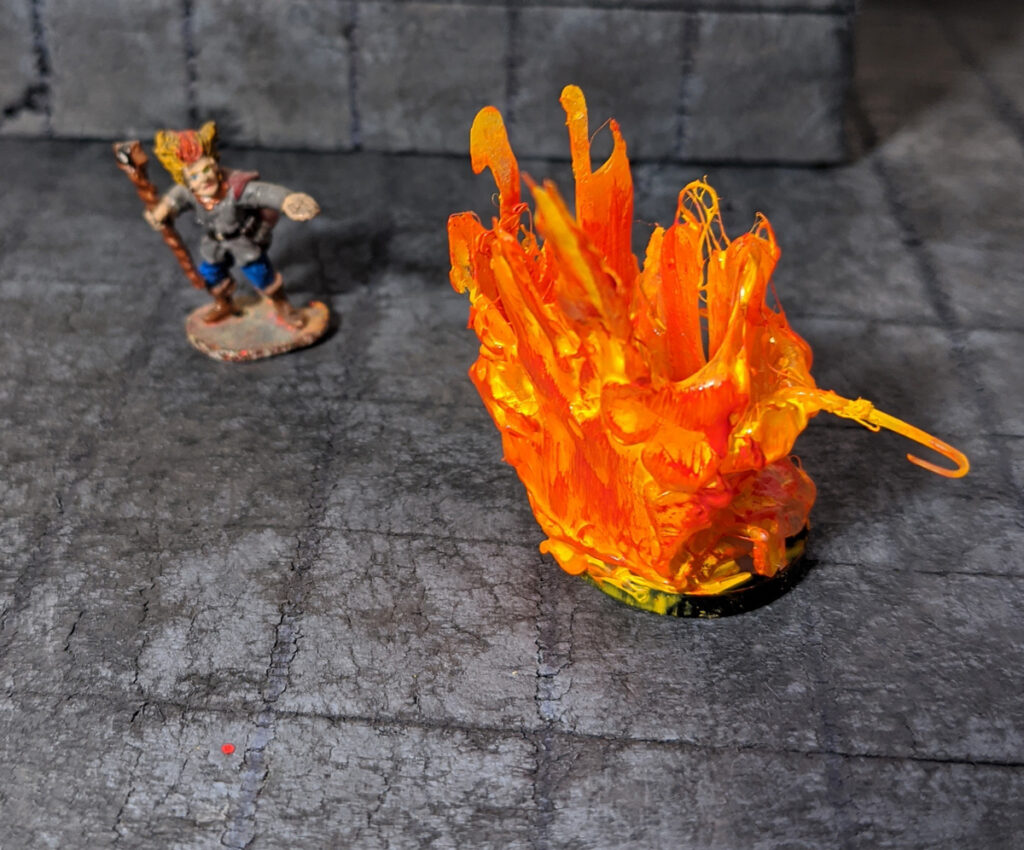
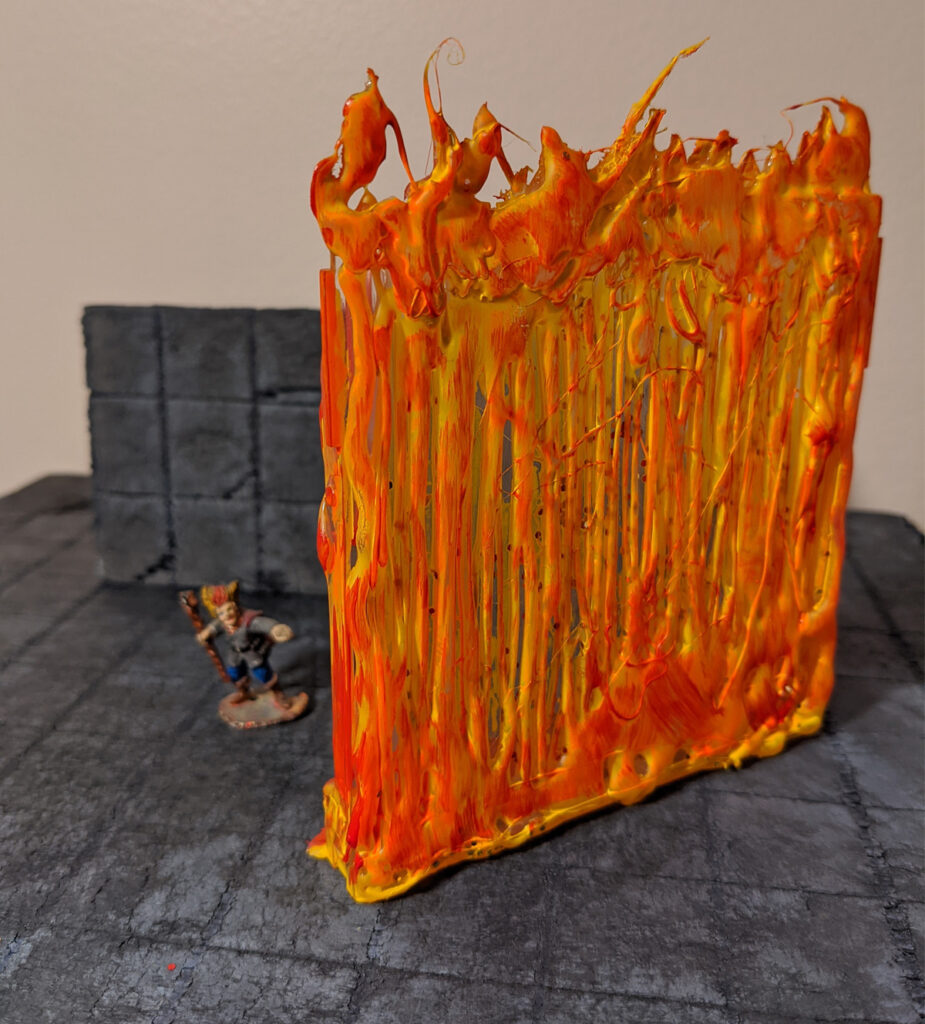
Sculpting things with hot glue is an art form. It takes practice. I gathered up the stuff I needed and laid things out. The spells I decided to create for were web, Evard’s black tentacles, entangle, flaming sphere and wall of fire. I’d seen a video talking about how to go about making most of these before and they felt like things I could handle.
I hadn’t seen the wall of fire before. I’d seen a magic circle spell effect. The concept was the same and, as luck would have it I found this old, flat computer disk case in the bits box. I figured I’d pull it in half and each half would be it’s own wall. I popped on some safety glasses and went after the one side with my craft snippers. Safety glasses were a very good idea, trying to snip parts out of brittle plastic… not so much. After completely destroying one half of the box I decided that minimal changes to the other side was the way to go. I liked the fact that is has a square edge that will help it stand without some kind of crazy extra base addition.
I also had this thought about the flaming sphere. I was going to use a miniature base and start with a clear pony bead. I also planned to sprinkle a little bit of glitter into the glue as it was cooling. I figure that each of these things is a magic spell effect and a little glitter wouldn’t hurt. I thought I could start with a little bit of glue in the center of the base, pop the bead on there then start working my “sphere” outward from there. As it turns out, gravity was not my friend here. It made everything droopy and very non-sphere like. I changed tactics. I laid out a flat set of flames on the parchment paper and decided to curl that around the round mini base. The effect would be less “sphere” but it would still give the idea. I went with it.
Not so spherical
Forged ahead and started laying out the squares for the area effect things like web, tentacles and entangle. Normally parchment paper is really great for not sticking to the hot glue. This time for some reason, when I laid out my squares the paper just would not let go of the glue. I did what I could and pulled them all apart once they were dry. Moving from piece to piece while waiting for things to dry was a big help. This is a definite bonus to multitasking.
Hot glue – the keyword is still “hot”
I gave a little bit extra to each of my squares. Some of it worked, some of it really didn’t. I used glow in the dark paint under the entangle spell. I added a little green glitter in with the flocking. I tried to get one or two extra bits of vine to stick and stay. The glow works where you can see it, if it’s dark enough. The flocking doesn’t look as great as I want it to and the vines just keep flopping off no matter what glue I use. I spray finished the whole thing and I’m just going to hope for the best. I added a little webbing from our Halloween decorations to my area effect for the web spell. I only painted the tentacles… and they seem to have turned out the best.
Painting the wall of flame and the flaming sphere worked out pretty well I think – and the wet palette actually is a super cool way to handle paints. I now understand why so many folks talk it up. I needed to take a break in the middle of these projects and when I got back all the pain was just as if I hadn’t left at all. I’ll be looking to the wet palette from now on.
I probably need to resize my wet palette
I struggled with various parts of each of these projects. The biggest issue I have still, is patience. I’m working very hard at getting better with this. Paint needs time to dry. Glue needs time to dry. Hot glue needs time to dry of you’ll burn your damn finger… again. Sometimes the effect you think will be great doesn’t work out that way. It’s a learning process. I’m looking forward to doing a lot more learning on these sorts of projects moving forward.
Here are some of the finished looks:
Sinister Black TentaclesEntangle, magically wrapping you in natureWeb, tangled up and waiting for a spiderFairly non-spherical flaming sphereAn imposing wall of flame!
When I was a kid playing Dungeons & Dragons there weren’t many options when looking for parts to enhance your game. The hobby was relatively new and the market was just ramping up. You may be thinking, “here we go, another things were better back in the day statement”. Not so. I’m actually stunned, amazed and really happy about where things are for D&D and associated parts of the hobby right now.
Some lucky few of us as kids were able to work for or add to the Christmas list official D&D miniatures. I’ve managed to hang on to those, but I no longer have any of the other things we used to supplement our game. One of the things we used to do was carve up any corrugated cardboard we could lay out hands on and cut them up into various combinations of squares. These flat ’tiles’ became what we used to represent the fabled 10′ x 10′ stone corridor that has become synonymous with classic dungeon crawls. I clearly remember the shoe box of cardboard I had filled with various combinations of corridor or room that could be laid out to show the ‘surroundings’ of the miniatures we were using. The imagination assistance worked really well.
Fast forward to today. There are multiple companies out there now selling every sort of miniature pieces or parts for dungeon masters to layout and confound players with. The pure art of these pieces really is exceptional.
An example of a professional modular set.
It is also expensive. Paying the artists is important, but frequently WAY out of budget range.
Happily, the internet has also provided a way to connect with other people that are just as excited about creating these worlds as I am. There are literally thousands of folks out there coming up with new and imaginative ways to use various bits and pieces from around the house to create these worlds on a budget. I started posting a little while back about my journey back into this, and I’ve gone back to the very basics.
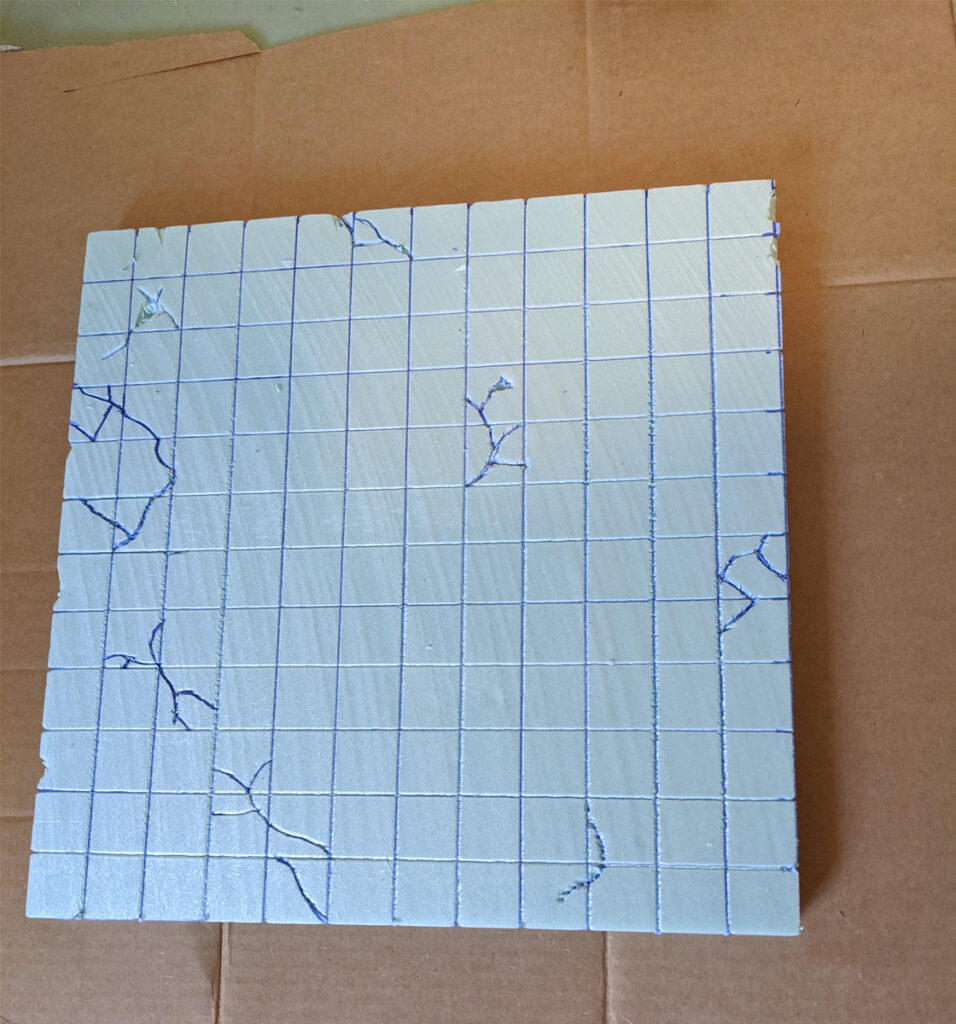
I made up some dungeon tiles.
It’s a very beginner level project. I saw a fellow crafter post something wondering about being proud of simple things, like these beginner projects. One of the most challenging things I’ve found about digging back into this hobby is learning to be patient and go through the various steps toward learning and experience. You don’t get to be a pro on day one. Stack up the lessons… and the dungeon tiles.
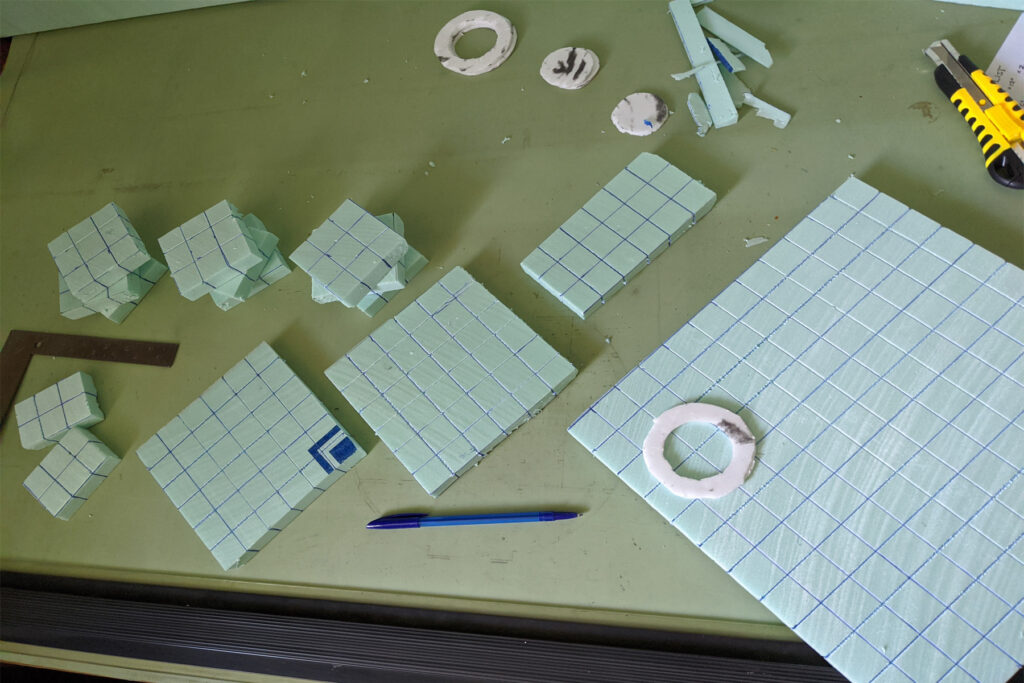
I started off with 1/2” extruded polystyrene insulation board (XPS) and carved up a bunch of shapes that would be my new set of tiles. I did all of this with a metal carpenters square, a pen and a box cutter. No high end, out of the budget stuff here. After carving all those bits up, I understand why crafters go after hot wire cutters and other expensive tools. This was labor intensive. I found that even on my best cuts, I wasn’t necessarily square or plumb. I forged ahead. These were meant to be faux stone after all. Anything carved by hand would have imperfections and odd edges.
Carving out a stack of tiles!
Once all the parts were cut, I laid out a 1” x 1” grid on all the tiles. This is the size of a large number of standard miniature bases and provides a convenient method for estimating distances at scale. I also added in a number of imperfections using the ball point pen. The idea was to gouge the foam. This would allow paint to get into the cracks and show the variations when painted. When I was painting I discovered that I probably needed to apply more pressure when creating my textures and adding cracks. I don’t think I went deep enough in many cases, so the paint mostly filled some of the cracks I made. As a YouTube crafter I follow said, “Crack to taste”. I did. I’ll do better next time.
Crack to taste.
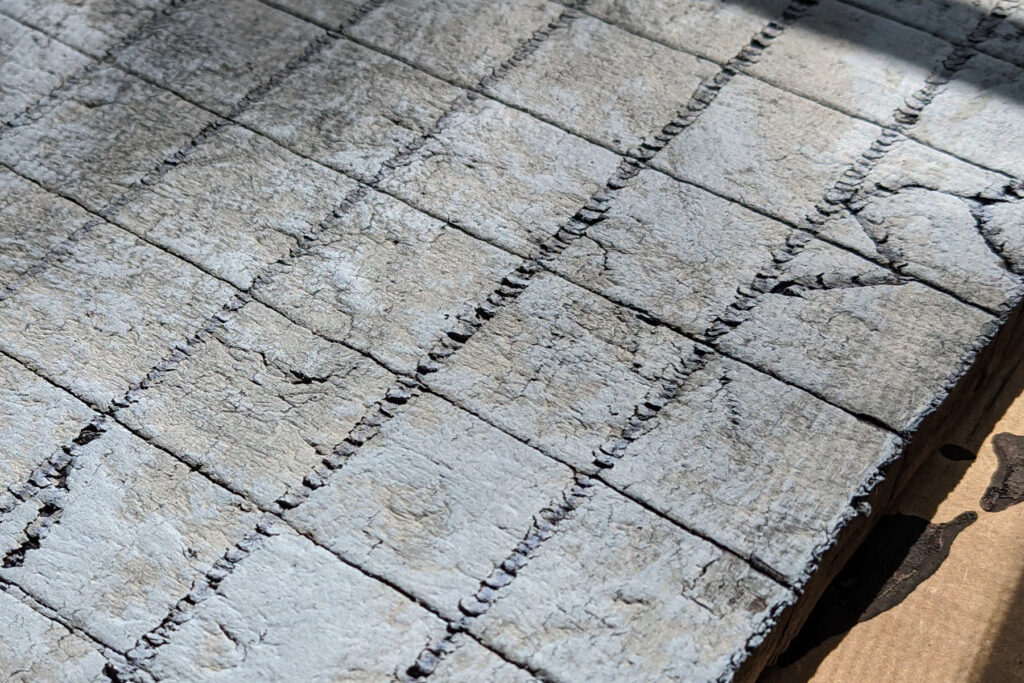
Once all the parts were set it was time to paint. It’s been a long time since I attempted to judge how much paint I might need in order to cover various miniature parts. I managed not to waste too much in my multiple coats. Black was first. I watered down a little bit of straight up black craft paint and covered them all. This would show up as deeper shadows whenever the rest of the paint was applied and didn’t seep down into all the cracks. Just had to wait for it to dry.
Once that was dry, it was on to a gray coat. This gray was applied pretty heavily. I was afraid that I had over done it when I finished with the gray. Some of the cracks had filled in. It was hard to see the texture. I wasn’t super happy, but I was this far along, I just needed to keep rolling. And wait for it to dry… again.
I thought it was too heavy, or too dark… or too… something.
Next up was a dry brush over the high points. I misjudged the amount of paint a couple of times and my brush was not nearly as ‘dry’ as it was supposed to be. I used some paper towel and dabbed the excess back off when I could. I mixed a light (dolphin) gray along with a color called blue stoneware. It gave things a bit of a blueish tint, but that’s OK. It was what I was going for.
The black crisscross pattern is actually the shadow of the window screen
Just had to wait for things to dry… again.
No good…
Once that bit was done, it was on to the wash. Back to black, but super watered down. I forgot to add in any sort of green or brown to add a feel of “grime” to this part, but I was just happy to be moving on. Looking back, I might have wanted to give each step a little more thought. As I said above, nobody’s a pro on day one.
Post wash
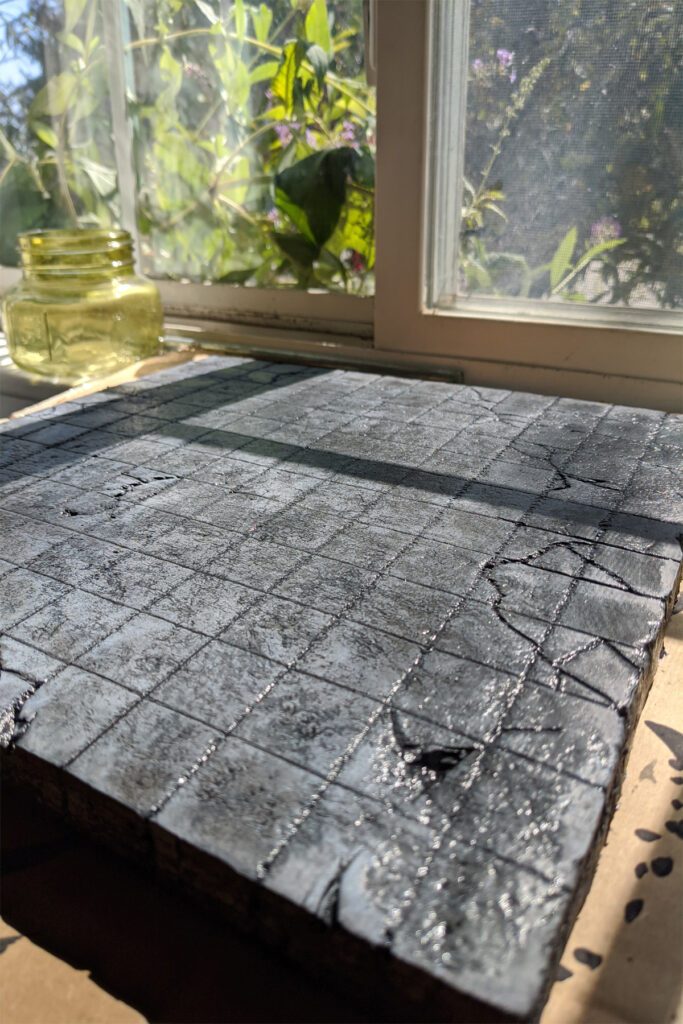
As things turned out, I’m a lot happier with them after all the steps were finished. So now it’s just a matter of sealing things up with a glue wash and stacking these up. Ready for my next gaming session! I’m calling this a success and I’m already looking forward to making more stuff.